Update: This shiped a few days ago.  More details here: http://weblogs.asp.net/scottgu/archive/2005/11/10/430283.aspx


Later this week Microsoft is shipping on the web a new free add-on to Visual Studio that enables what we call “Visual Studio 2005 Web Deployment Projects”.  This add-on provides a lot of additional deployment features and capabilities that complement the built-in web project support in the product.  The below blog post provides a quick overview of some of the new things coming.  There are also some MSDN whitepapers that will document it more exhaustively over the next week as well.


Some background


The web project model changed in a number of ways between VS 2003 and VS 2005.  There was a lot of discussion this August over missing features that weren’t supported or were broken by it in Beta2 (examples: exclude file from project support, file-based assembly refreshes, the ability to not check-in \bin assemblies in source control, etc).  These specific issues were fixed in the final release of VS 2005, and a number of folks who previously had a lot of concerns have posted positive impressions of the new model lately.


One of the things we on the team still weren’t happy with, though, was the level of support in the vanilla product for more advanced deployment configurations/options beyond the core "Publish Web" scenarios built-into VS 2005 – specifically around assembly naming/output, advanced MSBuild customization, and other common scenarios that we’ve heard requests for over the years (for example: the ability to modify connection string settings depending on the build configuration, etc).


A couple of guys on my team have cranked over the last 2 months adding richer support for these scenarios that integrate nicely in the shipping product.  We’ve packaged up this work in a new free download we call “VS 2005 Web Deployment Projects” and which we worked to make sure was available for download this week (which is the week of VS 2005 launch -- so basically immediately when the product releases).  This download does not touch any shipping binaries within VS 2005, but instead uses the extensibility support within the IDE and ASP.NET to integrate in a fairly cool way. 


We think the resulting feature-set offers the best of both worlds – specifically the productivity benefits of rapid development brought with the new dynamic web project model, as well as the richness of a highly customized build/deployment system.


VS 2005 Web Deployment Project Feature-Set


The VS 2005 Web Deployment Project download adds a number of features that integrate nicely inside VS 2005 including:


1) More control over the number of assemblies generated by a pre-compiled web project, as well as control over their naming.  Specifically, you can now generate a single named assembly for all pages + classes in your web project (for example: MyCompany.MyWebApp.dll).  Alternatively, you can also now optionally generate a separate named assembly for each directory of pages/controls in your project (for example: MyCompany.MyWebApp.SubFolder1.dll and MyCompany.MyWebApp.SubFolder2.dll).  This later option is particularly useful for large content web-apps where you would like the ability to incrementally patch code updates.


2) The ability to utilize the full power of MSBuild to customize your build process.  You can now use MSBuild to define pre and post build rules, exclude folders from building, automatically create IIS vdirs and site mappings, add custom assembly versioning information, and add any custom MSBuild task you want to your build process.


A VS 2005 Web Deployment Project stores all of its settings inside an MSBuild based project-file.  It also adds support for opening and editing the web deployment MSbuild project file directly in the IDE (w/ full intellisense support for it) – something that actually isn’t supported by any other project type in VS.


3) The ability to define and use custom build-configurations inside Visual Studio, and define per-build configuration options.  In addition to using the built-in “debug” and “release” configurations, for example, you could define custom build configurations like “staging”.  You can then vary your web deployment MSBuild tasks and actions based on these.


4) The ability to customize and modify a web application’s web.config file at deployment.  There is now IDE support for changing values likes connectionstrings or app-settings as part of the build process.  You can also vary these values based on the VS build configuration – so for example you could have one set of connectionstrings that you use for development (when you have the build configuration set to “debug”), and then have them modified as part of the build-process to your test/staging or production databases when you choose a “staging” or “release” build configuration in the IDE.


There are also a host of other features to take advantage of.  The upcoming whitepapers on MSDN will go into more detail on these, as well as the 40+ new web deployment related MSBuild tasks that it ships with that you can use to customize things even further.


Example Walkthrough of using a VS 2005 Web Deployment Project


Below is a simple example that walks-through using the VS 2005 Web Deployment Project download to customize the deployment of a VS 2005 based web site project.


Step 1: Development my web project


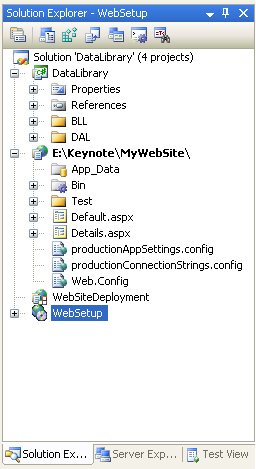
Below is a screen-shot of a common web application solution structure – where I have 1 or more class library projects and then a web-project containing my web app.


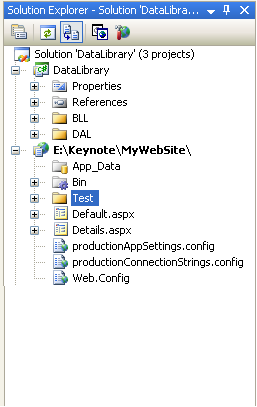
I can build the application using the standard web project model that ships with VS 2005, and take advantage of the productivity enhancements it provides.


Step 2: Adding a VS 2005 Web Deployment Project


As my web app progresses, I’ll need to think more about deployment.  To take advantage of the new deployment features the web deployment add-in provides, I can right-click on any of my web projects in the solution and add a Web Deployment Project (note: it is the 3rd item in the context menu below):


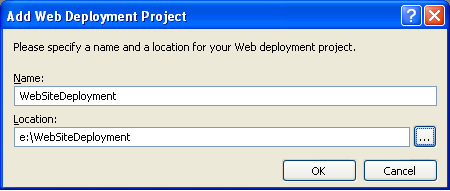
This will prompt me for what I want to name the project and where to store its project file:


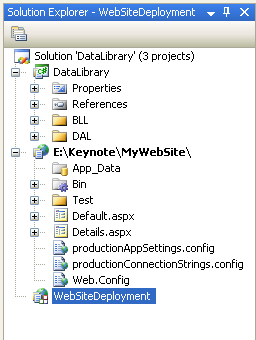
The web deployment project will then show up as part of my solution:


Associated in the e:\WebSiteDeployment directory is a new MSbuild based project file that contains deployment and build settings for my web-project.


Note that a single web-site project can optionally have multiple deployment projects associated with it.  You can also have multiple web-site projects in a solution, each with a separate web deployment project (for example: a user control library project that you pre-compiled and then copied into another web app project that used it).


Step 3: Setting Build and Deployment Options


To customize build and deployment settings I can either use the built-in GUI property pages for the deployment project, or edit the MSBuild file directly.  I’ll show this second more advanced option later – for right now I can just right-click and pull up the property pages for the project, or double click on the WebSiteDeployment node (which is a short-cut for the same thing) to customize its properties.


There are several screens of information (the MSDN whitepaper will go into them all – for here I’ll just show a few highlights).  One thing to note is that the settings are configured per-VS build configuration – so you can have one set of options for “debug”, one set of options for “release” and optionally define your own build configurations like “staging” and configure custom options for that build configuration as well.  I’m going to change the settings below to apply for the “release” build configuration.


Here are a few of the more common things developers will want to control:


1) Developers can control whether to pre-compile the web entirely, or to support html source updates.  Only the later option was supported in VS 2003 – and meant that you always had to deploy your .aspx source files on your production server (these were in turn dynamically compiled by ASP.NET at runtime the first time the app was run).  ASP.NET 2.0 still supports this compile option (we call it the “allow updates” option in VS 2005).  ASP.NET 2.0 also now supports a mode where you can optionally compile everything inside VS – including the .aspx/.ascx control definitions and html source.  This produces a more efficient version of the app, and eliminates the need for a first-time dynamic compile performance hit when your app is run.  It also allows you to protect more of the IP of your site, and enables you better compile-time checking of your application.  The first property page in the web deployment project allows you to choose either this new compile mode, or the preserve .aspx source mode that VS 2003 used.


2) Developers can control what granularity of assembly output they want the website compiled down to, as well as what names to use for the assemblies (this is controlled on the output assemblies tab):


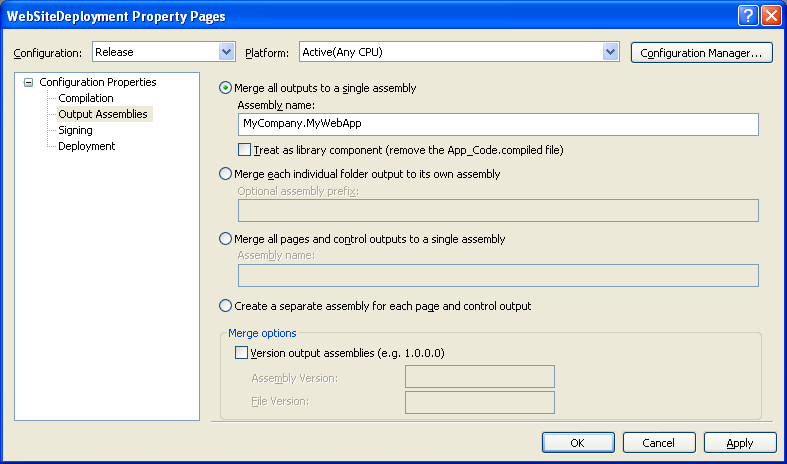
The default option is to merge the entire web-site into a single assembly that you can name however you want.  This merges the output of all page/control compilation, app_code, and web-services into a single assembly (leaving one file to deploy). 


There are other options you can choose as well for more granular control over the assembly generation.  For example, the second option above lets you compile each folder in your website into a separate named assembly (for example: MyCompany.MyWebApp.Folder1, MyCompany.MyWebApp.Folder2).  This is useful for patching large applications where you want to make a tactical update to just a portion of the site.


If you have an AssemblyInfo.cs/.vb class in your app_code directory, the deployment project will use the meta-data it contains to version the produced assemblies.  Alternatively, you can also set the version information specifically in the IDE.  This in turn saves it as an MSBuild variable in your project file.  You could optionally use a custom MSbuild task to set this variable dynamically at build-time (for example: to use a policy like we do at Microsoft where the build number is based on the current date).


3) The developer can then optionally use the deployment tab for other common deployment scenarios:


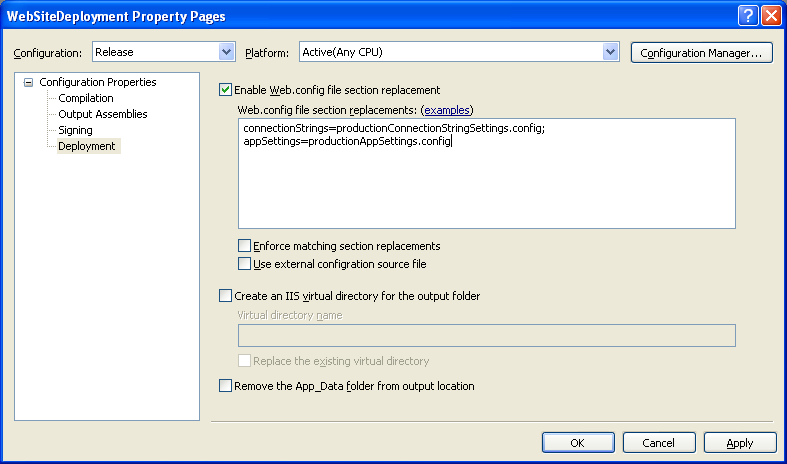
One of these is the ability to replace the application’s web.config settings at build-time.  This can be done on a configuration section by section basis.  Simply list the name of the section to replace, and an XML file containing the replacement settings.  You can choose to have them replaced either in-line within the web.config file (the default), or to use the new configSource attribute option in ASP.NET 2.0 to dynamically point the web.config file at external configuration files that contain the values.


Because all values in the settings dialog can be configured on a per-VS build configuration basis, this means that you can have one set of configuration file replacement settings per build configuration (for example: one connectionstring setting for “debug”, one connectionstring setting for “staging” and one connectionstring setting for “release”). 


The other options included on this dialog is the ability to dynamically create and map an IIS vroot to the output directory as part of the build process, as well as the ability to delete the app_data directory as a post-build step (useful in cases where you want to delete the SQL Express database you’ve been using for development, and instead map your Membership, Roles, Profile, Personalization and HealthMon providers to a full SQL Server production database).


Step 4: Adding Optional Advanced MSBuild File Customization Rules


The above GUI property pages provide support for the most common build configuration settings.  One neat thing about the Web Deployment Projects, though, is that there is easy IDE support for dropping down into the MSBuild file directly and customizing things further.


To-do this in the IDE, simply right click on the web deployment project and select “Open Project File”:


This will bring up an XML editor with intellisense support for the project file:


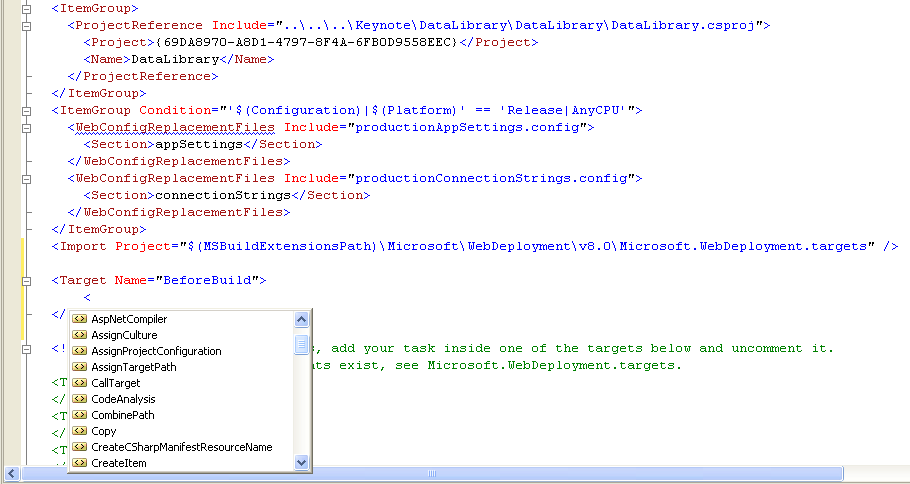
You can make changes, and then hit save to update things dynamically.


The web deployment project adds support for pre and post build events that you can use to customize things.  For example, if you wanted to make sure a custom directory was created in your generated app after building, you could use the built-in MSbuild <MakeDir> task in the AfterBuild event:


  <Target Name="AfterBuild">

    <MakeDir Directories="$(TargetDir)\Upload" />

  </Target>


If you want to exclude a “Test” directory that contains some sample test pages from building in your release configuration you could add something like this:


  <ItemGroup>

    <ExcludeFromBuild Include="$(SourceWebPhysicalPath)\Test\**\*.*"/>

  </ItemGroup>


Note that you can use wild-card extensions when excluding things (above it is using *.* to exclude everything under the test directory) – so you can get quite fancy with your exclude rules.  MSBuild itself ships with tons and tons of built-in build tasks (like MakeDir).  The Web Deployment Project download adds support for another 40+ custom tasks specific to web application development/deployment.  The really cool thing is that it is also easy to build your own MSBuild tasks and add them to projects as well.


Once you’ve made any custom tweaks, just hit save on the project file and close the window.  Note that you can still use the property page dialogs above even after customizing the project file – it will preserve your settings and not blow them away.


Step 5: Building the Web Deployment Project


Now that I have my deployment project all setup, I can simply do a “Build Solution” to build all the projects in my solution – including my new web deployment project.  This will then generate an output folder for my website.  Contained within it is a \bin directory that has two assemblies (one for my data class library, and one for my web project):


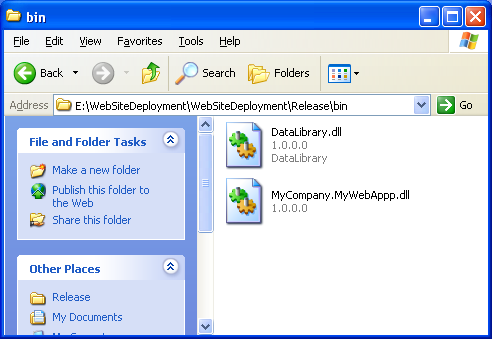
The web.config file for my application has also been updated to have my production connectionstring settings.


One typical optimization that we’ll recommend would be to only build the web deployment project when your application is ready to be deployed – and not during actual development (instead when actively developing just work with the web project directly as normal).  You can easily configure this in the VS build configuration manager:


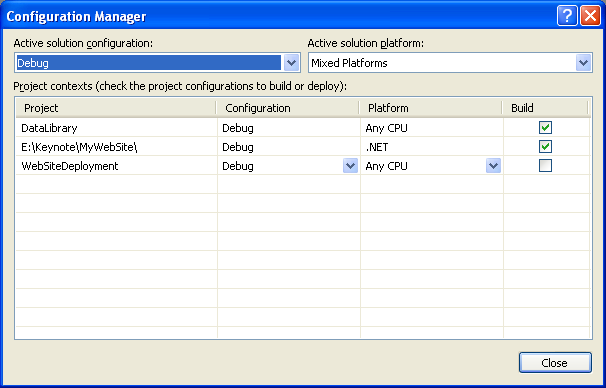
For example: with the above settings we are configuring the WebSiteDeployment project to not build when the “debug” release configuration is set – and only do so when in “release” mode.


You can then use the build configuration drop-down on the toolbar to quickly switch between debug and release modes depending on where you are with the project:


Step 6: Optional Setup Project


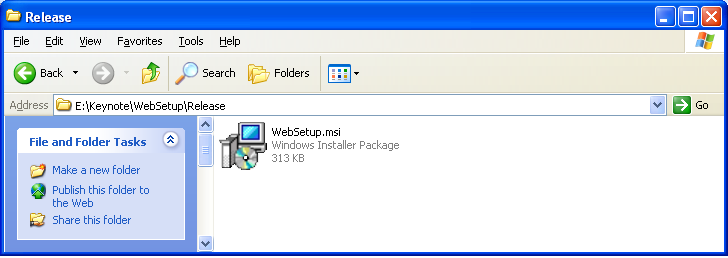
One last bonus step that is also possible is adding a “Web Setup” project into our above solution.  This is a standard VS 2005 project type that supports packaging a .msi file along with logic to create a vroot and deploy an application when executed:


I can easily configure the WebSetup project to pipe in the output from my WebSiteDeployment project into the MSI. 


Then, while I select “Build Solution” again I’ll build my web deployment project, pipe it into the setup project, and I’ll be left with a .MSI setup program for my web application that will walk me through creating an IIS vroot and deploy my production app on a web-server when run:


Next Steps


Our plan is to post the first release of the VS 2005 Web Deployment Project for free download on MSDN this week.  We'll then gather and incorporate feedback and release an updated version later this year. 


We hope you find it useful.  Let us know what you think and what additional features and MSBuild tasks you’d like to see added to it.


Thanks,


1. .NET Framework를 이용한 Silverlight 개발하기 / Silverlight 개발 시작하기


2. Silverlight 입력 이벤트에 대한 핸들러 작성


3. 기본 제공 컨트롤의 모양 바꾸기


4. 커스텀 컨트롤 만들기


5. Silverlight 애플리케이션이 로드 되는 동안 Splash 스크린 보여주기


6. 데이터 컬렉션으로 작업하기


7. Silverlight에서 Plain XML 메시지 보내고 받기


8. WCF 서비스를 만들고 Proxy를 통해 접근하기


9. Silverlight 로 신디케이션 피드에 접근하기


In part one, a buttonlike control was created. It worked like a button, or at least a little. It was a square with a descriptive text and a brand new Click event. Unfortunately that doesn't really make it feel like a button. There is more to a button, especially in Silverlight and WPF. First off, a button normally gives some visual feedback to the user, confirming that it is pressed or that the button is hovering over it. That visual feedback is something that you find in most button implementation, wether it is in Windows Forms, HTML or WPF. The thing that is special with buttons in WPF and Silverlight is that the content of the button - in this case the descriptive text - can be anything. And I mean ANYTHING. It could be a Grid with several controls inside. Not that I would recommend doing some of the things that you CAN do, but it is possible. So in this part of the tutorial, the button will get visual feedback and support for complex content.

Lets start off with the support to add anything as content in the control. To add this support is actually pretty simple. First off the TextBlock, that is in the template now, must be removed. Or actually not so much removed as replaced, replaced with a ContentPresenter. The the inheritance of the control has to be changed from Control to ContentControl. That's all there is to it. Oh..yeah...and remember to remove the Text property as well, since it isn't being used anymore it shouldn't be in there...

<TextBlock Text="{TemplateBinding Text}" 
           HorizontalAlignment="Center" 
           VerticalAlignment="Center"
           Foreground="{TemplateBinding Foreground}"/>

Is replaced with

<ContentPresenter HorizontalAlignment="Center" VerticalAlignment="Center" />

And the inheritance of the control is changed to

public class MyButton : ContentControl
{
    ...
}

So...this change now forces a change in the "test button". Change the "test button" from using the Text property to use the newly added Content property instead. It could look something like the following

<btn:MyButton Width="100" Height="50" Background="Yellow" Foreground="White" Click="MyButton_Click">
    <btn:MyButton.Content>
        <TextBlock Text="Hello Content" />
    </btn:MyButton.Content>
</btn:MyButton>

The eventhandler of course has to be changed as well, since it works with the Text property. To have the same effect, the new TextBlock has to be named and then modified from the handler

<btn:MyButton Width="100" Height="50" Background="Yellow" Foreground="White" Click="MyButton_Click">
    <btn:MyButton.Content>
        <TextBlock Text="Hello Content" x:Name="ContentText" />
    </btn:MyButton.Content>
</btn:MyButton>
private void MyButton_Click(object sender, MouseEventArgs e)
{
    ContentText.Text = "Hello again";
}

So...now that the content part has been changed, it is time to take care of the visual changes. In the Silverlight 2 beta, all visual changes where based on animations with specific names that were then called from the controls code. The idea is the same today, but it is a little less "fragile". Animations are still responsible for the visual changes, but they aren't called by name from code anymore. This use of specific named is too "fragile". Instead a new control was introduced, the VisualStateManager. The VisualStateManager is responsible for setting states. A state is a specific visual state. So the different states are defined in the VSM and then the code uses the VSM to set. How does this make it less fragile? Well, this will be shown in a little while.

The cool thing about the VSM is that it supports states and state groups. Only one state within a state group can be set at once. But multiple state groups can have states set. So in the MyButton control, there will be only one state group. But if you have a look at for example the Button control it uses two groups, "FocusStates" and "CommonStates". But as said before, the MyButton control will only have a single state group called "CommonStates". Inside that group, it will have 3 states - "Normal", "MouseOver" and "Pressed". These states might not seem logical to everyone, but the cool thing is that every developer can choose the names of the groups and states by themselves. So in this case...it is like this...comprende...

So...to start using the VSM it has to be added to our xaml. This isn't really hard, but it is in a separate assembly and namespace so we need a new xml namespace in the xaml.

<ResourceDictionary 
    xmlns="http://schemas.microsoft.com/winfx/2006/xaml/presentation"
    xmlns:x="http://schemas.microsoft.com/winfx/2006/xaml"
    xmlns:local="clr-namespace:MyButton"
    xmlns:vsm="clr-namespace:System.Windows;assembly=System.Windows"
    >
...

Next it is time to add the state groups and states. This can be done from 2 directions. Either setting them in code first and them create the xaml, or starting from xaml and then doing the code. It doesn't really matter as long as the different groups and states are already set on paper somewhere... In this case, it will start in the xaml. The VSM is added inside the root Grid like this

<Grid Background="{TemplateBinding Background}">
    <vsm:VisualStateManager.VisualStateGroups>
        <vsm:VisualStateGroup x:Name="CommonStates">
            <vsm:VisualState x:Name="Normal" />
            <vsm:VisualState x:Name="MouseOver" />
            <vsm:VisualState x:Name="Pressed" />
            </vsm:VisualState>
        </vsm:VisualStateGroup>
    </vsm:VisualStateManager.VisualStateGroups>
    ...
</Grid>

Now that all the group and all the states are in there, it is time to add the actual visual changes. This is done by adding animations inside the VisualState elements. So select the states that should be handled and add a Storyboard inside that VisualState. In this case the Normal state will be left empty, that will make it return to the original layout when that state is set. So to handle the MouseOver and Pressed states, the Xaml is changed like this

<vsm:VisualStateManager.VisualStateGroups>
    <vsm:VisualStateGroup x:Name="CommonStates">
        <vsm:VisualState x:Name="Normal" />
        <vsm:VisualState x:Name="MouseOver">
            <Storyboard>
                <ColorAnimation Storyboard.TargetName="BackgroundBrush" 
                    Storyboard.TargetProperty="Color" To="Red" />
                <DoubleAnimation Storyboard.TargetName="BackgroundBrush" 
                    Storyboard.TargetProperty="Opacity" To=".5" />
            </Storyboard>
        </vsm:VisualState>
        <vsm:VisualState x:Name="Pressed">
            <Storyboard>
                <ColorAnimation Storyboard.TargetName="BackgroundBrush" 
                    Storyboard.TargetProperty="Color" To="DarkRed" />
                <DoubleAnimation Storyboard.TargetName="BackgroundBrush" 
                    Storyboard.TargetProperty="Opacity" To=".5" />
            </Storyboard>
        </vsm:VisualState>
    </vsm:VisualStateGroup>
</vsm:VisualStateManager.VisualStateGroups>

That gives the button some seriously uggly effects, but it will at least make some visual changes... The only problem now, is that the time it takes for the animation is too slow. To counter this, it is possible to add a VisualTransitions telling the VSM how much time to spend on each animation. The Transitions property is set like this

<vsm:VisualStateManager.VisualStateGroups>
    <vsm:VisualStateGroup x:Name="CommonStates">
        <vsm:VisualStateGroup.Transitions>
            <vsm:VisualTransition To="Normal" GeneratedDuration="0:0:0.2"/>
            <vsm:VisualTransition To="MouseOver" GeneratedDuration="0:0:0.2"/>
            <vsm:VisualTransition To="Pressed" GeneratedDuration="0:0:0.2"/>
        </vsm:VisualStateGroup.Transitions>
        ...
</vsm:VisualStateManager.VisualStateGroups>

That is all the Xaml needed. Now it is time to start setting the states from code. The first change that is needed is to handle one more event. The event in question is the MouseEnter event. That changes the constructor to look like the following

public MyButton()
{
    DefaultStyleKey = typeof(MyButton);
    this.MouseEnter += new MouseEventHandler(MyButton_MouseEnter);
    this.MouseLeave += new MouseEventHandler(MyButton_MouseLeave);
    this.MouseLeftButtonDown += new MouseButtonEventHandler(MyButton_MouseLeftButtonDown);
    this.MouseLeftButtonUp += new MouseButtonEventHandler(MyButton_MouseLeftButtonUp);
}

The handler is all emtpy for now. It will only be used for the state handling. Now...the next part is to start handling the states. To set a specific state, all that needs to be done is to call VisualStateManager.GoToState(). It takes three parameters. First the object to set the state on, then the name of the state and finally if a transition should be used. THis is kind of cool, because it makes it possible to set the states of other objects and not only your own object...be careful though... So...lets set the state in the different handlers. No...lets not do that. What should be done is to create a method that handles the actual setting of the state. That way all state setting is handled in one place. To support this method, there needs to be some way of telling it what to set. How about sending in the state to the method. No...then you are back to the distributed handling of states... Add a couple of state bools in the class. Then the handlers can set the state bool that is relevant and then just call a state setting method and let it figure out what to do. Something like this

bool _mouseOver = false;
bool _mousePressed = false;

private void SetState()
{
    if (_mousePressed)
        VisualStateManager.GoToState(this, "Pressed", true);
    else if (_mouseOver)
        VisualStateManager.GoToState(this, "MouseOver", true);
    else
        VisualStateManager.GoToState(this, "Normal", true);
}

After adding this simple method it is possible to implement the handlers. All they have to do is set the bool values and then call SetState(). In this control this seems like "a lot" of extra work, but in a control with several state groups and and more states, it makes it a lot simpler to handle different state combinations. The handlers should look something like this

void MyButton_MouseLeftButtonDown(object sender, MouseButtonEventArgs e)
{
    _mousePressed = true;
    SetState();
}
void MyButton_MouseLeftButtonUp(object sender, MouseButtonEventArgs e)
{
    if (_mousePressed)
    {
        OnClick(e);
    }
    _mousePressed = false;
    SetState();
}
void MyButton_MouseEnter(object sender, MouseEventArgs e)
{
    _mouseOver = true;
    SetState();
}
void MyButton_MouseLeave(object sender, MouseEventArgs e)
{
    _mousePressed = false;
    _mouseOver = false;
    SetState();
}

That's it! Well...more or less. I was talking about how fragile the old state handling system was with specifically named animations...this doesn't seem a lot better. Well, so far it isn't. The only difference is that we get some state help from the VSM with groups and things. But it is still state names with strings that we have to figure out if we change the template. The solution to this is attributes. There are two attributes that help us when it comes to templating through tools like Expression Blend. TemplateVisualState and TemplatePart...by setting these attributes on our control, tools like Blend can automatically figure out what parts and states are available and add tooling support for it. The TemplateVisualState has 2 properties, GroupName and Name. They are both strings and define what groups and what states the controls code use. The TemplatePart attribute is a little different. It tells the tool what "parts" it needs in the template and what types they are.

Parts? What? I get states, but what is parts... Well, say that your control expects there to be a button somewhere in the template so that it can handle the user clicking it. Well, if somebody changes the template for the control, they have no idea that there should be that specific button and what it should be named unless they are told. The Slider control is a perfect example. The Slider consists of a bunch of different parts that it needs to work. The attributes for the Slider looks like this

[TemplatePart(Name="VerticalTrackLargeChangeIncreaseRepeatButton", Type=typeof(RepeatButton)), 
TemplatePart(Name="VerticalThumb",Type=typeof(Thumb)), 
TemplatePart(Name="HorizontalTemplate", Type=typeof(FrameworkElement)), 
TemplatePart(Name="HorizontalTrackLargeChangeIncreaseRepeatButton", Type=typeof(RepeatButton)), 
TemplatePart(Name="HorizontalTrackLargeChangeDecreaseRepeatButton", Type=typeof(RepeatButton)), 
TemplatePart(Name="HorizontalThumb", Type=typeof(Thumb)), 
TemplatePart(Name="VerticalTemplate", Type=typeof(FrameworkElement)), 
TemplatePart(Name="VerticalTrackLargeChangeDecreaseRepeatButton", Type=typeof(RepeatButton)),
TemplateVisualState(Name="Normal", GroupName="CommonStates"), 
TemplateVisualState(Name="Focused", GroupName="FocusStates"), 
TemplateVisualState(Name="Unfocused", GroupName="FocusStates"),  
TemplateVisualState(Name="MouseOver", GroupName="CommonStates"), 
TemplateVisualState(Name="Disabled", GroupName="CommonStates")]

Thats a lot of states and parts. So how to know what parts to add in you template if there wasn't TemplatePart attributes. The important thing when adding this attribute is to use as broad a type as possible. If you use a Rectangle in the default template, but only use features defined in UIElement, you should define the TemplatePart type to be UIElement. This makes it possible to create the widest variety of templates for the control. Again, the Slider is a perfect example. It defines the HorizontalTemplate as FrameworkElement...that is very early in the inheritance chain for Silverlight, making it possible to be VERY creative with the HorizontalTemplate.

How does a control use the parts it has defined? Well, the MyButton control wasn't complicated enough to use parts, but here is how it should have been done. Since the parts are defined in the template, it isn't possible to code against them straight off. The best way to get hold of the parts is by overriding the OnApplyTemplate() method. This is called as soon as the template is applied to the control, totally ignoring if the template if the default one or one defined by the user. Inside this method it is possible to get hold of named elements, parts, inside the template by calling GetTemplateChild(). This method will of course work outside of this method as well, as long as it is called after the template has been applied. It takes the name of the part as parameter and returns object. Use the "as" operator and beware of the very possible possibility of getting null back, since the template might not define that part. If a part is missing, there is a choice to make. Can the control work without it or should an exception be thrown. Well...it depends on the control... It could look like this

public override void OnApplyTemplate()
{
    base.OnApplyTemplate();
    FrameworkElement fe = GetTemplateChild("MyPart") as FrameworkElement;
    if (fe != null)
    {
        fe.MouseEnter += ...
    }
    ...
}

Now, there are a couple of tips and convention that some people talk about. First of all, in WPF there is some convention that the name of a part should start with "PART_". In Silverlight this doesn't seem to be considered important. When dissasembling Microsofts own controls, this convention isn't followed... It's up to you...
The next thing would be to make the name of the parts into static fields... Well, that I could sort of agree with and accept. It could look something like this

[TemplatePart(Name=MyButton.MyPartName, Type=typeof(UIElement))]
public class MyButton : ContentControl
{
    public static readonly string MyPartName = "MyPartName";
    ...    
    public override void OnApplyTemplate()
    {
        base.OnApplyTemplate();
        FrameworkElement fe = GetTemplateChild(MyButton.MyPartName) as FrameworkElement;
        ..
    }
    ...
}

But once again, that is up to the developer (you). Having it like this makes it less fragile to typing errors.

That concludes my 2 part tutorial about creating custom controls. It is far from exhausting, but should give you enough information to get started building your own controls. Supporting templates makes your controls so much more useful, since the control can be used over and over again with the same functionality, but appearing to be a totally new and good looking control. But since all "built in" Silverlight controls are templatable, make sure you aren't creating unnecessary controls. Try to re-template existing controls instead, since this is less work and less likely to introduce bugs in the system.

By the way, try adding the MyButton control to a page and use Blend to work with the template. By doing this, you will see that Blend automatically picks up the VisualState attribues and add them so that you can create the animations. Just add the control to a page, open the page in Blend and right-click the control and choose "Edit Control Parts (Template) > Create Empty". Even if the new template is empty, it will have the different states available in the States pane.

Thank you for reading and hope you got something good out of it. Don't hesistate to ask questions or add comments about the tutorial!

+ Recent posts