RSS is a great thing. It streamlines easily the communication between a content provider and its readers. RSS nowadays are everywhere. News sites, blogs, content driven sites. By subscribing to a RSS feed you can reach a broader audience by eliminating the need of a computer, just have a mobile with RSS reader capabilities and you are good to go. As a powerful content management tool, of course SharePoint enables RSS syndication for its contents.

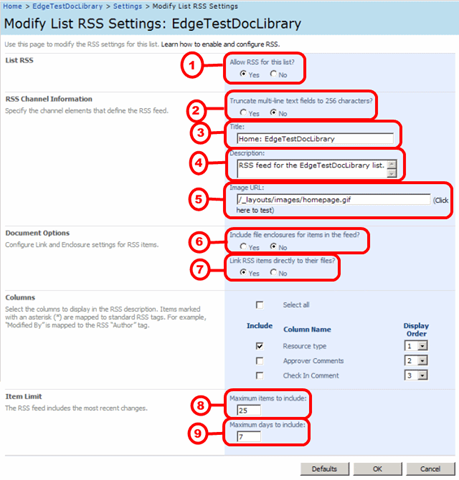
Let’s take a look at the UI page where we can configure the RSS feed of a document library:

sharepoint-configure-rss-setting

So, can we customize the RSS features exposed by a SharePoint library programmatically ? The answer is yes, but unfortunately this task is not as straight forward as one might think.

If you look the SPList properties, you will not find anything related to them. If you look at the SPListItems, you will not find anything related to them.

So where are these properties? They are in fact in the RootFolder property of the list. The RootFolder is an object of type SPFolder and sets various properties for the files and contents associated with the list as a collection of items.

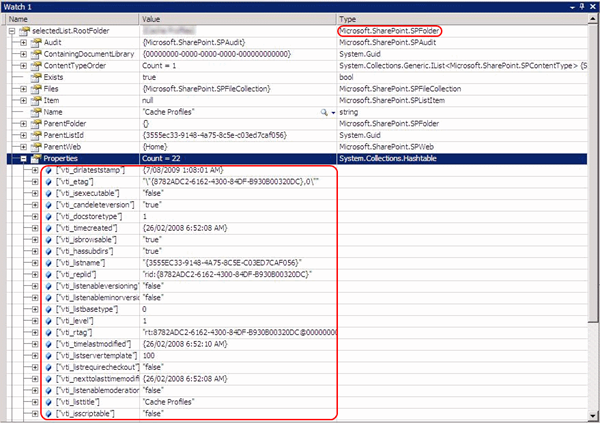
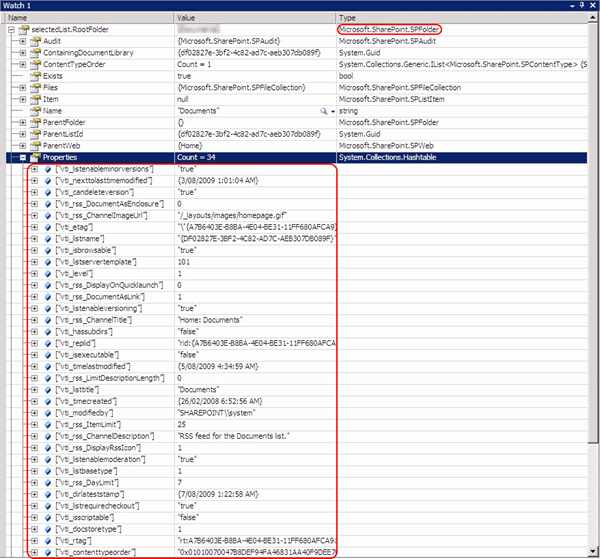
And guess where these RSS feeds settings are specified? Yes, in that same collection, exposed as a key-value pair. But even if you try to inspect that with your preferred tool, you won't be able to see it clearly. Not even with SharePoint Manager sometimes. For example, take a look at these 2 RootFolders properties, from 2 different SPLists, being visualized with SharePoint Manager.

spm-sharepoint-manager-splist-rss-2

spm-sharepoint-manager-splist-rss-1

So…You see, the first one does not expose any RSS related property values, but the other one does. That's because the later has  SPListTemplateType.DocumentLibrary as its base type.

Since the SharePoint operations and behaviours rely extremely on the exposed APIs, we would assume these are the kind of stuff you would have access via an API call. I for one was not expecting to modify straight into the property values of a key-value par exposed by a SharePoint collection itself. Yeah, pretty tricky. SharePoint does its own things by its own ways. 
Anyway, these are the things you can modify from our RSS settings screen:


sharepoint-configure-rss-setting2

1) EnableSyndication : internal property, refer to the code below

2) vti_rss_LimitDescriptionLength : Controls if the item content will be exposed complete in the feed of just the first 256 characters.

3) vti_rss_ChannelTitle : name the RSS feed

4) vti_rss_ChannelDescription : Short text to describe the feed

5) vti_rss_ChannelImageUrl : Specifies which image will be displayed when a RSS reader consumes the feed

6) vti_rss_DocumentAsEnclosure : Indicates if will any documents associated with the feed are included as enclosure. ( I assume, becaue I have not tested that to explain better )

7) vti_rss_DocumentAsLink : Indicates if you can expose the documents included in the feed as link direct to the file. Very common for podcast RSS feeds, for example.

8) vti_rss_ItemLimit : Limits how many items are going to be exposed in the feed

9) vti_rss_DayLimit : Limits how many days will the feed content display. This will work combined with the vti_rss_DayLimit; the most restrictive one, wins.

Also there are some more fields that are not exposed by the UI, but still exists in property collection:

vti_rss_DisplayRssIcon : Indicates if the image in the vti_rss_ChannelImageUrl is an icon file. It will be displayed in the navigation bar of web browsers, for example.

vti_rss_DisplayOnQuickLaunch : I did not test that, but I imagine it will add the feed to the quick launch links in the homepage.

After all the settings were done, there is one more catch: Call the Update() method not from the list, but from the RootFolder object

public void ApplyRSSSettings(Microsoft.SharePoint.SPList selectedList)
{
    // display RSS for this list
    selectedList.EnableSyndication = true;

    // set NO to truncate RSS multiline text to 256 chars
    selectedList.RootFolder.Properties["vti_rss_LimitDescriptionLength"] = 0;

    // set NO to include file enclosures
    selectedList.RootFolder.Properties["vti_rss_DocumentAsEnclosure"] = 0;

    // set YES to link rss to files
    selectedList.RootFolder.Properties["vti_rss_DocumentAsLink"] = 1;

    // set RSS maximum items to 25
    selectedList.RootFolder.Properties["vti_rss_ItemLimit "] = 25;

    // set RSS maximum days to 7
    selectedList.RootFolder.Properties["vti_rss_DayLimit"] = 7;

    // commit the changes to the list
    selectedList.RootFolder.Update();
}


인터넷 브라우저나 OWA 에서 문서 URL를 클릭시 읽기 전용으로 열리게 된다.

브라우저 보안상 문서를 편집 모드로 열도록 해주는 스크립트가 디폴트로 동작을 하지 않게 되어 있다고 한다.

디폴트를 풀어주는 방법으로 아래와 같은 레지스트리 키를 수정하면 된다.
(단, 오피스 2003 에서는 적용되지 않는다.)
[HKEY_CURRENT_USER\Software\Microsoft\Office\12.0\Common\Internet]
"OpenDocumentsReadWriteWhileBrowsing"=dword:00000001


Once I was working with a custom search webpart issue in which search was implemented by using FullTextSqlQuery method, but it was not returning any results whenever we use contains predicate to filter the date time type columns.

There was a custom managed property of type Date Time to filter in the custom webpart. Since it was not returning any results in the custom webpart, we added that managed property in OOB advance search web part to include the custom managed property in the pick property section. After that, selected the date time managed property and executed the search by giving the same value that we given in the custom search webpart and it returned the correct results. We also checked the ULS logs to check the query used to execute the search with the date time type managed property in the filtering condition.

We saw that there is a difference in the construction of query between the custom webpart and the query executed in OOB (out-of-the-box).

SharePoint has only 3 filtering conditions with any managed property of type Date and Time. So, we must need to construct a query in a way that SharePoint can internally understand. If you pass ‘07/08/2009’ as your input date value SharePoint will convert that input date value in the format of ‘2009/07/08 18:30:00’ internally. You can see the query in the ULS logs once you execute a search in UI.

I have captured the SQL syntaxes for all the three filtering conditions. (eg: 07/08/2009 as our input date value)


Equal

Full Text Query: SELECT WorkId, Rank, Title, Author, Size, Path, Description, Write, SiteName, CollapsingStatus, HitHighlightedSummary, HitHighlightedProperties, ContentClass, IsDocument, PictureThumbnailURL  from scope() where ("scope" = 'All Sites') And ((Created >= '2009/07/07 18:30:00' and Created < '2009/07/08 18:30:00'))


Earlier than

Full Text Query: SELECT WorkId, Rank, Title, Author, Size, Path, Description, Write, SiteName, CollapsingStatus, HitHighlightedSummary, HitHighlightedProperties, ContentClass, IsDocument, PictureThumbnailURL  from scope() where ("scope" = 'All Sites') And (Created < '2009/07/08 18:30:00')


Later than

Full Text Query: SELECT WorkId, Rank, Title, Author, Size, Path, Description, Write, SiteName, CollapsingStatus, HitHighlightedSummary, HitHighlightedProperties, ContentClass, IsDocument, PictureThumbnailURL  from scope() where ("scope" = 'All Sites') And (Created > '2009/07/08 18:30:00')

You can refer the above syntaxes for building your SQL query for filtering date type managed properties.


As far as industry standard goes, WLAN standard “b” supports speeds up to 11 Mbps while WLAN standard “g” supports speeds up to 54 Mbps.

That being said, you can improve your WLAN speeds on your Windows Mobile Professional device by enabling the “g mode” of your device’s WLAN card (disabled by default on most devices). While playing with SKTools, I discovered a registry change that you can undertake to achieve this. Download the cab and install it to device, the soft reset. It will change the value of dot11SupportedRateMaskG from the default 4 (1 in some cases) to 8 inside HKEY_LOCAL_MACHINE\COMM\TNETWLN1\PARMS.
Note: Some devices don't have that structure in the registry. If it's your case, our cab will create it automatically.

For comparison, we have benchmarked internet speed on a Touch HD, using the mobile speed test from DSLReports; needless to say, after enabling the “g mode”, internet speed boosted up to more than 3 times before, from 540 kbit/sec and 15.261 sec to 1731 kbit/sec and 4.917 sec.
Note: you need to connect to an 802.11g enabled access point in order to achieve these results. Connecting to a 802.11b will not benefit from any speed increase as "g mode" needs to be supported on both ends.


캐논 400D 유저를 위한 반가운 소식이 있네요(좀 늦은감이 있지만 -_-쿨럭;)

DSLR시장을 활성화 하는데 가장 큰 공헌을 했던 캐논 EOS400D 보급기는

아마도 국내에서(뿐만 아니라 해외에서도)가장 많이 팔린 제품일텐데요.

그 동안 사용하면서 스팟측광이나 ISO의 폭이 크지 않아 조금은 아쉬운 점이 있었습니다.

(물론 보급기로써의 성능은 좋지만 말입니다)


오늘은 캐논 EOS 400D에 사용하는 CF메모리 카드의 업그레이드를 통해

3가지 측광모드(평가측광,부분측광,중앙중점 부분측광)외에 추가로 스팟측광

ISO를 16~3200까지 자유롭게 확장 하고, 컷수확인 할 수 있는 프로그램을 소개해 드립니다.


우리가 만지는 모든 전자 제품이라는 것이 사실은 성능을 잠가두어서 그렇지

사실상 더 많은 영역을 사용할 수 있는 경우가 많습니다.

캐논 400D 역시 제품 생산 당시에 정해진 규격을 위해 사용 영역을 제한 해두었지만

이런 펌웨어 업그레이드를 통해 성능을 더 많이 발휘할 수 있지요.

(CPU의 오버클럭을 통해 더 높은 성능을 발휘하는 것처럼 말입니다.)


지금부터 설명하는 것들을 순서대로 잘 따라 하시어 400D와 함께 멋진 추억들을

담으시길 바랍니다. ^^


400D 메모리카드 업데이트 후 뭐가 좋아질까요?


1. 3가지 측광모드 외에 스팟층광모드 추가

2. ISO의 확장성(16~3200까지)

3. 컷수 확인기능 추가


<펌웨어 완료 후 변화한 모습>


업데이트에 필요한 조건(꼭 확인 하세요!!)


1. 펌웨어 버전 1.1.1버전

(확인 방법 400D의 MENU 누르고 방향키 >를 맨 끝으로 가져가면 가장 하단에 펌웨어 버전이 나옵니다.

1.1.1이하는 캐논 컨슈머이미징 홈페이지로 가서 업그레이드를 받으세요.)

http://www.canon-ci.co.kr/actions/FrontPage?cmd=list&url=/ckcifront/support/download/firm_list.jsp


2. 충전 100%완료된 배터리장착

(업그레이드 도중 배터리가 나가면 심각한 문제가 발생합니다. -_-;;)


3. CF메모리 카드리더기 준비


4. CF메모리 카드 완전 포멧(FAT)


5. 첨부된 파일 다운로드 후 압축해제


업데이트 순서(순서를 반드시 지켜주세요!!)


1. CF메모리를 카메라에서 분리 후 카드리더기를 통해 PC에 연결 후 포멧(FAT)을 해주세요.

포멧전에 사진이 있다면 미리 PC로 옮기시고요.

포멧이 완료되면 첨부된 파일을 압축해제하시고 폴더안에 testfir.fir 파일을 메모리 카드로 복사해주세요.


2. 파일이 복사된 CF메모리를 400D에 장착 후 펌웨어버전(1.1.1)로 이동후 펌웨어 업데이트 실행을 눌러주세요.

(배터리가 충분하지 않은 경우 업데이트 불가능 메세지가 표시됩니다.)


- 실행을 눌러 정상 진행되면 화면이 한 번 깜박거리고 난 후 전원스위치에 불만 들어오고 아무런 반응이 없습니다.

- 5분 정도를 그대로 놔 둡니다.(아무 것도 만지지 마세요!!)

(메뉴얼 상에서는 10초면 된다고 하지만 5분정도 그냥 나두셔요. 물론 5분이 되도 전원스위치에 불만 들어오고 아무런

반응이 없습니다. 물론 정상입니다. 안심하세요 ^^)


3. 전원 스위치를 off 시킵니다.

- 여전히 전원표시부분에 불이 들어오고 꺼지지 않습니다. 정상입니다. -_-

- 배터리를 400D에서 분리하신 후에 다시 장착합니다.


4. 전원 스위치를 on 시킵니다.

- 메뉴로 들어가 펌웨어버전을 확인해 봅니다. 1.1.1입니다. 네. 그렇습니다. 정상입니다. -_-;;


5. 전원 스위치를 off 시키고, CF메모리 카드를 분리 후 리더기에 연결하여 PC에 연결합니다.


6. CF메모리 카드를 다시 포멧(FAT)합니다.


7. 포멧이 완료되면 다운받아 두었던 폴더에서 cardtricks145-sfx.exe를 압축 해제해 주세요. 그러면 cardtricks145.exe파일이

생성됩니다. 이것을 실행해 주세요.


실행시 다음 그림과 같은 화면이 나옵니다.


<순서 중요합니다!! 반대로 진행하시면 안됩니다!!>


8. 풍선 표시한 1번 부분 CF boot sector 을 체크하세요.


9. 풍선 2번 make bootable를 클릭합니다.


10. 메시지가 뜨며 CF메모리가 부팅 가능하다고 나옵니다.

(혹시 나중에 라도 제대로 잘 되지 않는다면 made bootable 옆에 Format as FAT을 누르고 다시 Make Bootable를 눌러줍니다. 디스크가 부팅가능한 상태가 되도록 만들어 주는 스위치 이므로 한 번 클릭하면 포맷하기 전까지는 비활성화 됩니다.)


11. 다운 받아둔 폴더 안에서 autoexec[1].bin20090913.rar 파일을 압축해제 하세요. autoexec.bin 폴더에 있는 파일 중 AUTOCXEC.BIN 파일만 CF메모리카드로 복사해서 넣습니다. (꼭!!! AUTOCXEC.BIN 파일만 복사해서 넣으세요!!)


12. CF메모리카드를 다시 400D 안에 장착 후 전원을 켜면 프린터로 전송 스위치(뷰파인더 왼쪽편에 있는) 버튼에 불이 깜박- 하고 들어옵니다.(앞으로는 전원을 켤 때마다 전원 불과 프린터 전송 스위치 불이 같이 들어올 것입니다.)


13. 여기까지 진행하시면 업그레이드가 완료 된 것입니다. 수고하셨습니다. ㅎㅎ^^


업그레이드 확인 및 설정방법


1. ISO를 1600에 맞춘 후 프린터로 전송 스위치를 한 번 눌러 보세요. ISO 값이 변합니다.

반대로 이번에는 ISO 값을 100에 맞춥니다. 프린터로 전송 스위치를 한 번 눌러보세요.

ISO값이 변합니다. 값이 변하면 업그레이드 성공입니다. ^^

(ISO 100이하의 설정에서 사진을 촬영하면 노출정보에 나오지 않는 점은 기억해 두세요 ㅠ_ㅠ)


2. 측광선택 버튼을 누르시고 프린터 전송 스위치를 누르세요.


그림과 같이 변경되면 업그레이드 성공 입니다. ^^


3. 컷수 확인 방법


- 메뉴 버튼 한 번 누르시고, 프린터 전송 버튼을 누르신 후, 다시 메뉴 버튼을 두 번 눌러서 메뉴 빠져나왔다가 다시 메뉴로 들어가면 맨 밑에

factory menu라는 항목이 생겨 있습니다.

- 그 항목으로 들어가신 후에 프린터 전송 버픈을 한 번 누르시면 Debug Mode로 들어가게 됩니다. (화면상 변화는 없습니다. 프린터 전송 버는을 눌렀을 때 삐익- 소리가 나면 Debug Mode로 들어간 것으로 보시면 됩니다.

-다시 메뉴 밖으로 나오셔서 측광설정 버튼을 누르셔서 스팟설정 메뉴로 들어가는 순간 CF메모리에 STDOUT.TXT 파일이 생성되게 됩니다.

-이 후에 CF메모리 카드를 PC상에서 열어서 STDOUT.txt 파일을 보시면 중간에 "Release"로 검색하셔서 그 위치로 가시면 옆에 있는 숫자가 Actuation Count입니다.


이 업그레이드를 하면 어떤 단점이 있을까요?


CF메모리 카드가 부팅이 가능해졌기 때문에 윈도우즈사진 불러오기와 호환이 안 될 수 있습니다.

400D의 작동시간이 길어질 수 있습니다.


사용하다가 다시 원래 상태로 돌리고 싶은데요?


사용이 불편해서 다시 원래의 400D로 돌아가고 싶으시다면

CF메모리카드만을 PC상에서 포맷(FAT)하시면 됩니다.


(의심없이 그냥 포맷만 하시면 원래의 400D로 돌아갑니다. -_-;;)


끝으로 간단하게 정리하자면 위에 방법은 스팟측광과 ISO영역대를 좀더 발전시키기 위한

펌웨어이고요. 이는 CF메모리 카드의 소프트웨어적인 업그레이드 입니다.


(저 같은 경우는 컷수 확인 부분은 따로 사용하지 않고, 스팟측광과, ISO확장만을 사용합니다)


따뜻한 댓글 한 줄이 필요합니다 ^^

'Misc' 카테고리의 다른 글

Booting USB 만들기  (0) 2010.05.04
[펌]A Tweak to Improve WiFi Speed  (0) 2010.03.29
Getting Word 2003 and 2007 to play nicely with each other  (0) 2010.03.15
Music Program  (0) 2009.11.13
Cannon 7D 공식 발표!!  (0) 2009.09.02

When you open a document that is hosted in a SharePoint document library in Word 2007, by default the document is shown with its metadata information from the library columns. I was looking for a way to hide this information by default each time I open a document from the server, but couldn’t find where to set this in the available Word Options .

Please note that the information panel can only be hidden through MOSS, not if you run WSS3 only. The documentation can be vague about it, and I wanted to accomplish this also for a WSS3 site after doing this successfully in MOSS. If you want to find out more details about this, please read this discussion.

I asked a Word expert at work, Jeremy, who hadn’t come across the issue before, but who obviously is a better googler than myself and he pulled up the solution — it is actually set on the SharePoint side of things, not from within Word.  The reason why I couldn’t come up with any relevant google results is that I did not know what this info area was called.  Jeremy found this important piece of the puzzle by hovering over the closing x at the top right corner of the panel — it’s called Document Information Panel. So what I need to do is to hide this panel by changing the Document Information Panel settings for a content type(Microsoft detailed instructions)

Here’s a screenshot of the default word behavior:

ms-word07-docinfopanel1

Hiding the Document Information Panel by default

  1. Select the Settings menu of the document library
  2. Under Content Types, click the name of the content type you want to change. 
    Important:  If you don’t have content types enabled, you will not be able to change the settings for the document information panel. If you have them enabled, skip to step 4.
  3. To enable content types, go to Advanced Settings of the library and set the radio button for Allow manage content types? to yes.
  4.  Under Settings, click on the title of the content type you want to modify.
  5. On the content type’s Settings screen, click Document Information Panel settings. 
    Content type settings page

    Content type settings page

  6. On the Document Information Panel settings page, clear the checkbox for “Always show Document Information Panel on document open…”
    document info panel checkbox

    document info panel checkbox

Voilà! No more property  info when  by default when you open the document.

To make the Document Info Panel visible again for the current document in Word, select Prepare>Properties from the Office button:

show document info panel from Prepare menu

show document info panel from Prepare menu


Many users, especially power users, have more than one version of Office installed on their computers. This configuration is not supported by Microsoft. However, Microsoft generally tries to make this configuration possible. There are lots of things to consider when running multiple versions of Office with the most important one being that the oldest version has to be installed first and the newest one last. Microsoft discusses all these things in KB 928091.


The KB notes that you will see Windows Installer messages when switching between different versions of Access and Word. For example, if you had Word 2003 open last and then opened 2007, you would see a setup dialog for a minute or so. If you had 2007 open last and then opened 2003, you would see a setup dialog as well. The main thing Windows Installer does in that minute is to return the Word file extensions associations (ownership of .doc e.g.) to the version of Word being opened.


For Access, there is unfortunately nothing that can be done to get around these annoying Windows Installer dialog. Thanks to the research of some Microsoft support people though, there is a way around these dialogs for Word (the KB does not document this).

It turns out that there is a registry key you can set that will force a particular version of Word to not claim the file extensions back. That means, setup will not run for that particular version of Word if it does not own its file extensions. The particular registry entry has been around for a long time already and is documented in KB 306021 as method 2, albeit for a different purpose. If you want Word 2007 to be the version of Word that owns the Word file extension, then use these steps:

  1. Close all versions of Word.
  2. Open Word 2007, let setup run (if it appears), then close Word.
  3. Open the registry editor and navigate to HKEY_CURRENT_USER\Software\Microsoft\Office\11.0\Word\Options
  4. Add a DWORD named NoRereg set to 1

원본 : http://pschmid.net/blog/2007/04/20/110


SharePoint has a cool and great facility called Quota templates. In order to get this facility in UI, you have to do the following. Refer: http://technet.microsoft.com/en-us/library/cc263223.aspx

Enable the site collection quotas in the central administration site – under application management.

clip_image002

Once you click on the “site collection quotas and locks” you will be redirecting to another page and there you can set your quota template and lock status.

clip_image004

Once you enable this one, then you can see a new link under the site collection administration section of your site.

clip_image006

Once you click on that link it will redirect to another beautiful page which is given below.

clip_image008

In the above page we can see all document libraries, documents and lists by selecting the “show only” drop down. Also here we can filter the result using the “Show items” drop down and also we can sort the list items using “Sort By” drop down.

The list will show the name of the list or library and the corresponding size and related information. Now we can see how we can retrieve this information through code. The below code is self explanatory and I believe it won’t confuse you any more J

We can go with the code if you want to create a custom view representation of this detail. Also it will help us if you want to get this information anywhere in your custom application.

   1: SPSite oSite = new SPSite("http://blr3r7-19c:13774/sites/testwp");
   2: DataTable oDtRawData = null;
   3:             
   4: // this line of code will return the stroage information of all the document lirbaries in this site
   5: oDtRawData = oSite.StorageManagementInformation(SPSite.StorageManagementInformationType.DocumentLibrary,SPSite.StorageManagementSortOrder.Increasing, SPSite.StorageManagementSortedOn.Size,100);
   6:  
   7: // this line of code will return the stroage information of all the lists in this site
   8: oDtRawData = oSite.StorageManagementInformation(SPSite.StorageManagementInformationType.List, SPSite.StorageManagementSortOrder.Increasing, SPSite.StorageManagementSortedOn.Size, 100);
   9:  
  10: // this line of code will return the stroage information of all the Documents in this site
  11: oDtRawData = oSite.StorageManagementInformation(SPSite.StorageManagementInformationType.Document, SPSite.StorageManagementSortOrder.Increasing, SPSite.StorageManagementSortedOn.Size, 100);
  12:             
  13: // if you wan to see column names, loop through all the columns and find out the names and grab the needed one. 
  14: foreach (DataColumn oColumn in oDtRawData.Columns)
  15:    {
  16:             Console.WriteLine(oColumn.ColumnName);                
  17:    }
  18: Console.ReadLine();
  19:  
  20: // loop through all the rows and find out the values. Here the size will be return in bytes (size/1024 = size in KBs)
  21:   foreach (DataRow oRow in oDtRawData.Rows)
  22:    {
  23:          Console.WriteLine(oRow["Title"].ToString() + " : " + oRow["Size"].ToString() + " : " + oRow["LeafName"].ToString());               
  24:    }
  25:  
  26: Console.ReadLine();  
 

IE 버젼별 UI 테스트 툴입니다.

 http://www.my-debugbar.com/wiki/IETester/HomePage


SQL index 초기화 쿼리문
DBCC checkident('테이블명', reseed, 0)

ArrayList는 값을 object형식으로 방식해서 받게 되어 모든 타입을 담을 수 있다.

하지만 Boxing이 일어나는데 이러한 빈번한 Boxing을 막기 위해 우리는 Generic에 있는 List<type>을 이용한다.

다음은 Boxing처리되는 ArrayList와 Boxing되지 않는 Generic List<>의 비교를 보도록 한다.

using System;
using System.Collections;
using System.Collections.Generic;

namespace ConsoleApplication1
{
    struct RGB
    {
        public int red;
        public int green;
        public int blue;

        public RGB(int red, int green, int blue)
        {
            this.red = red;
            this.green = green;
            this.blue = blue;
        }

        public override string ToString()
        {
            return red.ToString("X") + green.ToString("X") + blue.ToString("X");
        }
    }

    class Program
    {
        static ArrayList boxValue;
        static List noBoxValue;

        static void Main(string[] args)
        {
            DateTime start;
            DateTime middle;
            TimeSpan end;

            RGB rgb = new RGB(255, 255, 255);

            #region None Boxing

            Console.WriteLine("No Boxing : List.Add(RGB)");

            noBoxValue = new List();

            start = DateTime.Now;

            for (int i = 0; i < 10000000; i++)
                noBoxValue.Add(rgb);

            foreach (RGB value in noBoxValue)
            {
                string str = value.ToString();
            }

            middle = DateTime.Now;
            end = middle - start;

            Console.WriteLine("시작 = {0}, 끝 = {1}, 경과시간 = {2}", start.ToString("hh:mm:ss"),
                middle.ToString("hh:mm:ss"),
                end.ToString());

            #endregion

            #region Boxing

            Console.WriteLine("Boxing : ArrayList.Add(object)");

            boxValue = new ArrayList();

            start = DateTime.Now;

            for (int i = 0; i < 10000000; i++)
                boxValue.Add(rgb);

            foreach (RGB value in boxValue)
            {
                string str = value.ToString();
            }

            middle = DateTime.Now;
            end = middle - start;

            Console.WriteLine("시작 = {0}, 끝 = {1}, 경과시간 = {2}", start.ToString("hh:mm:ss"),
                middle.ToString("hh:mm:ss"),
                end.ToString());

            #endregion

            Console.Read();
        }
    }
}


사이트 템플릿 만들기


1.     Site Action / Create Site 클릭하면, New SharePoint Site 라는 화면이 나타난다.


2.     Template Selection / Select a template 탭 추가


-      C:\Program Files\Common Files\Microsoft Shared\web server extensions\12\TEMPLATE\(LCID)\XML WEBTEMP.XML를 해당 폴더에 Copy 하여 파일명을 WEBTEMP*****.XML로 변경한다. (, 파일명을 임의로 정하면 되지 않는다. 예를 들면, WEBTEMPSKT.XML)


-      복사한 WEBTEMPSKT.XML를 수정하는데, 예제를 통해 설명하자면,


<?xml version="1.0" encoding="utf-8"?>

<!-- _lcid="1033" _version="12.0.4518" _dal="1" -->

<!-- _LocalBinding -->

<Templates xmlns:ows="Microsoft SharePoint">

<Template Name="SampleTemplate" ID="10001">

<Configuration ID="0" Title="Global Avenue Community" Hidden="FALSE" ImageUrl="/_layouts/images/stsprev.png"

Description="A site for teams to quickly organize, author, and share information. It provides a document library, and lists for managing announcements, calendar items, tasks, and discussions.(SKT Global Avenue Community Site)"

                           DisplayCategory="SKT" >

                          </Configuration>

            </Template>

</Templates>


<Template>

Name : Site Template 이름 (C:\Program Files\Common Files\Microsoft Shared\web server extensions\12\TEMPLATE\SiteTemplates 밑에 사이트 템플릿을 만들 폴더 이름)

ID : Site Template ID인데, 임의로 지정(10000번 이상으로 지정하는 게 좋다고 한다.)


<Configuration>

ID : Configuration IDSite Template 만들 때 중요한 ID값이므로, 기억하는 게 좋다.

Title : 위 그림에서 보면 탭 안에 있는 템플릿 명을 나타낸다.

Hidden : 템플릿 탭을 보여줄지 여부를 체크한다.

ImageUrl : 우측 이미지 URL 주소를 나타낸다.

Description : 이미지 아래 설명 부분을 나타낸다.

DisplayCategory : 탭 버튼에 들어가는 텍스트를 나타낸다.(상단그림에서 빨간색 부분)


-      Site Template 폴더 생성

C:\Program Files\Common Files\Microsoft Shared\web server extensions\12\TEMPLATE\SiteTemplates\sts를 해당 폴더에 Copy 한다. 그 폴더 명은 WEBTEMPSKT.XML에서 정의한 Template Name으로 변경한다.


-      Site Template Onet.xml 수정


<?xml version="1.0" encoding="utf-8"?>

<Project Title="$Resources:onet_TeamWebSite;" Revision="2" ListDir="$Resources:core,lists_Folder;" xmlns:ows="Microsoft SharePoint">

<!-- _locID@Title="camlidonet1" _locComment="{StringCategory=HTX}" -->

<NavBars>…

<ListTemplates>…

<DocumentTemplates>…

<Configurations>…

<Modules>…

</Project>


             보통 수정해야 할 부분이 Configurations Modules 부분이다.


<Configurations>

<Configuration ID="0" Name="Default" MasterUrl="_catalogs/masterpage/GAComm.master">

<Lists>

<List FeatureId="00BFEA71-E717-4E80-AA17-D0C71B360101" Type="101" Title="Shared Documents" Url="doc" QuickLaunchUrl="doc/Forms/AllItems.aspx" />

<List FeatureId="00BFEA71-EC85-4903-972D-EBE475780106" Type="106" Title="$Resources:core,calendarList;" Url="$Resources:core,lists_Folder;/$Resources:core,calendar_Folder;" QuickLaunchUrl="$Resources:core,lists_Folder;/$Resources:core,calendar_Folder;/Calendar.aspx" EmailAlias="$Resources:core,calendar_EmailAlias;" />

<List FeatureId="00BFEA71-52D4-45B3-B544-B1C71B620109" Type="109" Title="Picture library" Url="picture" QuickLaunchUrl="picture/Forms/AllItems.aspx" />

                  </Lists>

                  <Modules>

                      <Module Name="Default" />

                      <Module Name="CustomMasterPage" />

                  </Modules>

                  <SiteFeatures>

                      <!-- BasicWebParts Feature -->

                      <Feature ID="00BFEA71-1C5E-4A24-B310-BA51C3EB7A57" />

                      <!-- Three-state Workflow Feature -->

                      <Feature ID="FDE5D850-671E-4143-950A-87B473922DC7" />

                  </SiteFeatures>

                  <WebFeatures>

                      <Feature ID="00BFEA71-4EA5-48D4-A4AD-7EA5C011ABE5" />

             <!-- TeamCollab Feature -->

                      <Feature ID="F41CC668-37E5-4743-B4A8-74D1DB3FD8A4" />

                      <!-- MobilityRedirect -->

<!-- 응답형 게시판 -->

                      <Feature ID="EE4DB430-EB44-4696-9E03-F6D70DFC144C" />

                      <!-- 사이트생성후 처리 -->

                      <Feature ID="A4DFAAF2-D2D0-45a2-8AC6-011B9E6B2088" />

                  </WebFeatures>

              </Configuration>

         </Configurations>


l  <Configuration> 설명

여기서 중요한 사항 중 하나가 WEbTEMP***.XML 에서 정의한 Configuration ID 값과 Site Template 에서 정의한 Configuration ID 값이 같아야 한다. MasterUrl은 해당 Url에 있는 file를 마스터로 등록한다.


Lists : 리스트 찍는 부분으로 FeatureId 는 리스트템플릿의 FeatureId, Type는 리스트 Type 번호

                 Title 는 리스트 이름, Url는 리스트 Url

Modules : 웹파트 추가, 마스터 페이지 파일 등록 등등 작업하는 곳

SiteFeatures : 사이트 모음 기능을 나타내며, Feature ID를 등록시, 기능 활성화 된다.

WebFeatures  : 사이트 기능으로 ID 등록시, 기능 활성화 된다.


         <Modules>

<Module Name="CustomMasterPage" List="116" Url="_catalogs/masterpage" RootWebOnly="FALSE">

                  <File Url="GAComm.master" Type="GhostableInLibrary" IgnoreIfAlreadyExists="TRUE" />

              </Module>

              <Module Name="Default" Url="" Path="">

                  <File Url="default.aspx" NavBarHome="True">

<View List="$Resources:core,lists_Folder;/$Resources:core,calendar_Folder;" BaseViewID="0" RecurrenceRowset="TRUE" WebPartZoneID="Left" WebPartOrder="2" />

<AllUsersWebPart WebPartZoneID="Right" WebPartOrder="0">

                   <![CDATA[

                      <webParts>

                           <webPart xmlns="http://schemas.microsoft.com/WebPart/v3">

                           <metaData>

<type name="SKT.TWorkplace.SPS.GlobalAvenue.WebParts.CommImage, SKT.TWorkplace.SPS.GlobalAvenue.WebParts, Version=1.0.0.0, Culture=neutral, PublicKeyToken=388b774ba96c947e" />

                           <importErrorMessage>Cannot import this Web Part.</importErrorMessage>

                           </metaData>

                           <data>

                           <properties>

                                    <property name="AllowClose" type="bool">True</property>

                                   <property name="Width" type="string" />

                                   <property name="AllowMinimize" type="bool">True</property>

                                    <property name="AllowConnect" type="bool">True</property>

                                   <property name="ChromeType" type="chrometype">None</property>

                                   <property name="TitleIconImageUrl" type="string" />

                                   <property name="Description" type="string" />

                                   <property name="Hidden" type="bool">False</property>

                                   <property name="TitleUrl" type="string" />

                                   <property name="AllowEdit" type="bool">True</property>

                                   <property name="Height" type="string" />

<property name="MissingAssembly" type="string">Cannot import this Web Part.</property>

                                    <property name="HelpUrl" type="string" />

                                   <property name="Title" type="string">Community Image</property>

                                   <property name="CatalogIconImageUrl" type="string" />

                                   <property name="Direction" type="direction">NotSet</property>

<property name="ChromeState" type="chromestate">Normal</property>

                                   <property name="AllowZoneChange" type="bool">True</property>

                                   <property name="AllowHide" type="bool">True</property>

                                   <property name="HelpMode" type="helpmode">Modeless</property>

                                   <property name="ExportMode" type="exportmode">All</property>

                           </properties>

                           </data>

                           </webPart>

                      </webParts>

                      ]]>

</AllUsersWebPart>

                  </File>

</Module>

         </Modules>


l  <Modules> 설명

<Configuration><Modules><Module Name=””>에서 정의한 Name과 동일하여야 한다.(Configuration 아래 Modules는 구성하는것이고, 실제 작업은 여기 Modules에서 한다고 생각하면 된다.)


<Module Name="CustomMasterPage" List="116" Url="_catalogs/masterpage" RootWebOnly="FALSE">

              <File Url="GAComm.master" Type="GhostableInLibrary" IgnoreIfAlreadyExists="TRUE" />

</Module>


사이트 템플릿을 만든 폴더 (, C:\Program Files\Common Files\Microsoft Shared\web se

rver extensions\12\TEMPLATE\SiteTemplates\SKTTemplate) 아래 있는 마스터 페이지를 마스터 페이지 갤러리에 등록하는 부분이다.


<Module Name="Default" Url="" Path="">

             <File Url="default.aspx" NavBarHome="True">

<View List="$Resources:core,lists_Folder;/$Resources:core,calendar_Folder;" BaseViewID="0" RecurrenceRowset="TRUE" WebPartZoneID="Left" WebPartOrder="2" />

<AllUsersWebPart WebPartZoneID="Right" WebPartOrder="0">…….


default.aspx 레이아웃(웹파트존) 정의 된 페이지로, 그 파일에 웹파트를 추가하는 부분이다. WebPartZoneID 는 웹파트존의 위치, WebPartOrder 웹파트의 순서를 나타낸다.


<AllUsersWebPart WebPartZoneID="Right" WebPartOrder="0">

<![CDATA[

...*******************************************

]]>

</AllUsersWebPart>


커스텀 웹파트는 ********** 부분에 웹파트 속성 정보(xml 형식)을 작성하면 된다.

웹파트 속성은 아래 그림과 같이 내보내기를 하면 해당 파일에 xml형식로 되어 있다.


대게 국내에 음악을 만들기 (프로듀싱)하는 소프트웨어는 DAW S/W라고 합니다. DAW는 디지털 오디오 워크스테이션의 약자이죠.


이 프로그램 중 가장 많은 사용자를 확보한 프로그램은 야마하로 넘어간 STEINBERG사의 CUBASE라는 소프트웨어와 ROLAND로 넘어간 (큭 그러고보니 둘다 일본 회사네..) SONAR가 있습니다.


그리고 제 3의 프로그램으로는 FL STUDIO가 있는데 주로 힙합이나 랩 같은 작곡에 많이 사용됩니다.


이런 소프트웨어들은 미디(일반 악보 작업)부터 가상 악기 작업, 녹음, 채널 믹싱 등 거의 모든 기능을 지원하는 프로그램입니다. 그래서 워크스테이션류의 프로그램이라고 하는 것이구요.


보컬만 레코딩과 오디오트랙 편집에서는 쿨에디터와 그의 상위 버전인 오디션, 사운드포지가 많이 사용되며 영상 편집과 겸용으로는 베가스도 많이 사용합니다.


그리고 간단한 악보 작업과 스케치는 기타프로 5가 거의 대세에 가까우며, 좀 더 전문적으로는 피날레, 시벨리우스 같은 소프트웨어가 있습니다.  이외에도 무척이나 다양한 프로그램들이 많이 있습니다만 대표적으로 나열한 것이 이 정도 입니다.


가격도 기타프로 5를 빼고는 어마어마한 가격대를 형성하고 있습니다.


전반적으로 컴퓨터 음악에 대해서는 http://blog.naver.com/utopia_11/70033398148

1. 프로그램의 설계 방법

  프로그램의 설계는 주어진 문제를 분석하여, 이를 표현하는 과정임. 설계는 넓게 입·출력 설계알고리즘 설계로 나누어진다.

           프로그램의 설계 과정 = 개략 설계와 상세 설계로 구분됨

       ※ 알고리즘(Algorithm) : 문제를 해결하는 방법 또는 문제를 해결해 가는 과정을 말함.

    1) 개략 설계 : 하향식(Top-down)으로 프로그램의 논리를 전개해 가는 방법이다.

     이미 설계된 입출력 자료들을 바탕으로 프로그램을 표현하여 상세한 수준이 아닌 프로그램의 개략적인 흐름을 구조적으로 나타낸다.

    2) 상세설계 : 코딩을 하기 위한 청사진을 제시하는 과정

     그래픽, 테이블, 텍스트 등과 같은 프로그램 설계 표현 방법들을 이용하여 프로그램의 세부적인 처리절차를 명세서로 작성

     상세 설계의 중요성

       자연어를 사용하여 세부 절차를 명시하였을 때 예상되는 이해의 모호성을 없애고, 자연어의 비구조적 설명으로 인한 프로그램의 비구조화 가능성을 최소화하는데 있다. 즉 보다 명확하고 구조적인 설명으로 코딩의 오류를 최소화하는데 그 목적이 있다.


2. 설계의 표기법

     설계 내용을 표현하기 위한 표기법에는 크게 그림으로 표기하는 그래픽 표기법(Graphic notation), 표의 형태로 표현하는 테이블 표기법(Table notation), 문장으로 표기하는 텍스트 표기법(Textual- notation) 등이 있다.

   1) 그래픽 표기법

      논리적 절차를 약속한 도형이나 기호를 사용하여 순서의 상세한 내용을 표현하는 표기법

      종 류 순서도(Flowchart)기법, 상자 도표(Box Diagam) 기법

      (1) 순서도(Flowchart)

       처리하고자 하는 문제를 분석하고 입·출력 설계를 한 후에, 그 처리 순서와 방법(처리과정 = 프로그램 논리의 흐름)을 결정하여 일정한 기호를 사용하여 일목요연하게 나타낸 그림이다.

      정 의 프로그램 논리의 흐름, 즉 처리과정을 다음 그림과 같은 기호를 사용하여 표현한 것.

      장 점 처리 내용에 따라 정해진 기호를 사용하므로 전체의 내용을 쉽게 파악할 수 있다.

     
         [ 순서도에 사용되는 작성 기호] 

      (2) 순서도에 사용되는 기본 기호

        처리를 표현하기 위한 직사각형, 조건에 따라 처리 내용을 달리 할 때에 사용하는 마름모, 흐름을 나타내는 화살표가 있다.

      (3) 순서도 작성시 흐름의 방향

       ① 위에서 아래로,

       ② 왼쪽에서 오른쪽으로

       ③ 선택형에서 양쪽으로 나누어지는 경우에는 조건이 참(True)인 경우에 오른쪽으로, 거짓(False)인 경우에 왼쪽으로

       ④ 반복형의 경우 조건이 참일 때 반복하는 내용은 오른쪽에, 거짓일 때 반복하는 내용은 왼쪽에 그린다.


     (4) 제어구조 3가지 표현

        ① 순차형

        ② 선택형

        ③ 반복형

   
    [ 프로그램의 기본 논리 구조 ]  


    2) 상자 도표

      사각형을 이용하여 상자 형태로 표현하는 그래픽 표기법으로, 구조적 프로그래밍에서 편리하게

      사용할 수 있다.  나시(Nassi)와 슈나이더만(Schneiderman)에 의해 개발되어 N-S 차트라고도

      한다.

      특 징 ▶

        (1) 단위 영역이 잘 정의되어 그림으로 쉽게 알아 볼 수 있다.

        (2) 제어를 임의의 곳으로 옮기는 것이 불가능.

     상자 도표는 반드시 구조적 방법에서 요구되는 하나의 입구와 하나의 출구로만 이루어지는 원칙을 제도적으로 보장함.

         
                              논리구조를 상자 도표에 의한 표현


3. 설계의 실제

   1) 순서도의 역할

     프로그램의 오류 검색에 있어서 문법적 오류에 대한 검색은 비교적 쉽지만, 논리적 오류를 검색하는 것은 쉽지 않다.

     논리적 오류 처리순서, 계산 순서나 회수의 오류, 비교하는 항목의 오류, 처리 방법의오류, 판단 방법의 오류 등이 있다.

     순서도의 역할

           ① 프로그램 코딩의 직접적인 자료가 된다.           

② 문서화의 역할을 한다.

           ③ 프로그램의 정확성 여부를 확인하는 자료가 된다.      

④ 프로그램의 인수, 인계가 용이하다.

           ⑤ 논리적인 체계 및 처리 내용을 쉽게 파악할 수 있다.  

           ⑥ 오류 발생시 그 원인을 찾아내는데 용이하다.

    2) 순서도의 종류

      순서도는 크게 개략 순서도(general flowchart, block flowchart) 와 상세 순서도(detail flowchart)로 나누어 진다.

      (1) 개략 순서도(general flowchart, block flowchart)

        프로그램의 전체적인 처리 방법과 순서를 한 눈에 파악할 수 있도록 프로그램을 큰 부분으로 나누어 개략적으로 나타낸 순서도

      (2) 상세 순서도(detail flowchart)

       개략 순서도의 처리 단계마다 모든 조작과 자료의 이동 순서를 하나도 빠짐없이 표시함으로써, 이것을 코딩만 하면 곧 프로그램이 작성될 수 있도록 세밀하게 그려진 순서도.

       개인별 예금의 원리합계 계산의 개략순서도와 상세순서도는 아래의 그림과 같다.


[개략순서도와 상세순서도]


   3) 순서도의 작성 요령

     ① 약속된 기호를 사용하여 누구나 이해하기 쉽도록 작성한다.

     ② 기호의 내부에 처리 내용을 한글, 영문, 또는 수식의 형태로 기술하며, 필요하면 기호의 외부에 주석을 붙여 그 내용을 명확히 한다

     ③ 처리 순서에 따라 그 흐름이 위에서 아래로, 왼쪽에서 오른쪽으로 이루어지도록 작성하여, 그렇지 않은   흐름은 화살표로 표시한다

     ④ 한 페이지에 작성할 수 없거나, 또는 어떤 조건에 의해 분기가 이루어질 때에는 연결 기호를 사용하여 표시한다.

     ⑤ 처음과 끝, 또는 처리의 블록, 즉, 부 프로그램에는 터미널 기호를 이용하여 표시하고 반복 처리의 내용을 명확히 한다.

   4) 순서도의 기본형

    순서도는 문제해결을 위하여 직선형, 분기형, 반복형 중의 세 가지 기본 형태가 조합되어 전체적인  프로그램 순서도로 작성된다.

     ① 직선형 순서도

       조건에 의해서 분기되거나 또는 일정한 내용을 반복 처리함 없이, 위에서 아래로 하나의 명령문씩 단계적으로 실행하여 실행 정지 명령에 도달되는 형태

    ② 분기형 순서도

       주어진 조건의 만족 여부에 따라 실행 내용이나 순서를 서로 달리하고자 할 때 작성되는 순서도

    ③ 반복형 순서도

       특정 조건이 만족되는 동안 어느 부분의 처리 내용을 반복 실행하도록 그려진 형태.

       반복되는 조건을 종료하는 조치가 없으면 무한 반복을 하게된다.

   5) 순서도 작성 연습

    예제 1

    이름, 몸무게를 입력하여 60Kg 이상이면 "비만", 아니면 "정상이라고 인쇄하는 프로그램의 순서도를 작성하라.

    
[판정 프로그램 순서도]

   예제 2

     n개의 수치가 배열 A 에 기억되어 있다고 가정하고, 이들 숫자 중에서 가장 큰 값을 골라 인쇄하는 프로그램의 순서도를 작성하라.

  
[최대값 찾기 순서도]

   예제 3

     n명의 신장이 배열 S에 기억되어 있다고 가정하고, 이를 오름차순으로 정렬(sorting)하는 프로그램의 순서도를 작성하라.

     i=1일 때 j는 2부터 n까지 증가하고, i=2일 때 j는 3부터 n까지 증가하기를 계속하며, i=n-1일 때j=n이 되어 마지막 처리를 한다.


[정렬 프로그램의 순서도]


    예제 4

      하나의 레코드에 상품명, 구입원가, 판매가가 수록된 레코드들을 읽어, 판매이익과 이익률을 계산하여 인쇄하는 프로그램의 순서도를 작성하라. (단, 명세서의 끝에는 전체의 합계도 인쇄한다)


[판매 일람표 프로그램 순서도]


Visual Studio 웹 사이트 및 웹 응용 프로그램 타입의 프로젝트를 생성하여
Visual Studio 가상 서버를 이용한 빌드가 아닌, 아래와 같이 사용자 지정 서버 사용을 이용하여 빌드가 가능하다.


이 때, 디버깅 관련 오류가 뜨는 경우가 있다.
그 해결법으로...

1. 루프백 확인 비활성화
  • 시작, 실행을 차례로 누르고 regedit를 입력한 다음 확인누른다.
  • 레지스트리 편집기에서 HKEY_LOCAL_MACHINE\SYSTEM\CurrentControlSet\Control\Lsa 레지스트리 키를 찾아 누른다.
  • Lsa를 마우스 오른쪽 단추로 누르고 새로 만들기를 가리킨 다음 DWORD 값을 누른다.
  • DisableLoopbackCheck를 입력한 다음 Enter 키를 누른다.
  • DisableLoopbackCheck를 마우스 오른쪽 단추로 누른 다음 수정을 누른다.
  • 값 데이터 상자에 1을 입력한 다음 확인을 누른다.
  • 레지스트리 편집기를 종료하고 컴퓨터를 다시 시작한다.


2. 호스트 이름 지정방법
   루프백 주소에 매핑되며 사용자 컴퓨터의 웹 사이트에 연결할 수 있는 호스트 이름을 지정하려면 다음과 같이 하면 된다.

  • 시작, 실행을 차례로 누르고 regedit를 입력한 다음, 확인을 누른다.
  • 레지스트리 편집기에서 HKEY_LOCAL_MACHINE\SYSTEM\CurrentControlSet\Control\Lsa\MSV1_0의 레지스트리 키를 찾아 누른다.
  • MSV1_0을 마우스 오른쪽 단추로 누르고 새로 만들기를 가리킨 다음 다중 문자열 값을 누른다.
  • BackConnectionHostNames를 입력한 다음 Enter 키를 누른다.
  • BackConnectionHostNames를 마우스 오른쪽 단추로 누른 다음 수정을 누른다.
  •  값 데이터 상자에서 로컬 컴퓨터에 있는 사이트의 호스트 이름을 하나 또는 여러 개 입력 한 후 확인을 누른다.
  • 레지스트리 편집기를 끝낸 다음 IISAdmin 서비스를 다시 시작한다.


+ Recent posts