I got requests may times and I thought I should write the steps to configuration of FBA with SharePoint 2010. I have detailed the steps in this blog.

SharePoint 2010 supports FBA, Like WSS 3.0 or MOSS 2007. It's a feature of ASP .Net which we use with SharePoint. SharePoint 2010 you can create web applications using Classic Based Authentication or Claims based Authentication. However, FBA can only be configured with web applications created using Claims Based Authentication.

What are the differences between Classic Mode Authentication and Claims based Authentication?

Classic Mode Authentication: It refers to the integrated windows authentication. You cannot configure the Forms based authentication if your web application is using Classic Mode Authentication. You can convert a web application from Classic Mode Authentication to Claims Based Authentication. However, that can only be done using PowerShell commands and its an irreversible process. I have detailed steps to convert the web application from Classic Mode authentication to Claims Based Authentication.

Claims Based Authentication: SharePoint 2010 is built on Windows Identity Foundation. It enables authentication from windows as well as non-windows based systems. This also provides the capability to have multiple authentication in a single URL.

Configuration of FBA with SharePoint 2010 involves 4 major steps. The steps to configure the FBA with SQL membership Provider are below:

I> Create or Convert existing web applications to use Claims Based Authentication

II> Create User IDs in SQL Database

III> Modify web.config file

IV> Give Permissions to users present in SQL database

Note: If you want to configure FBA with LDAP membership Provider then you can refer TechNet article.

Please find the detailed steps below:

I> Create or Convert existing web applications to use Claims Based Authentication

Note: - Web Application has to be created from the Central Administration console or PowerShell, however it should be using Claims Based Authentication.

A. Creating web application using Central administration

      • Open Central Administration Console.
      • Click on Manage Web application Under Application Management.
      • Click on new on the Ribbon.
      • Chose Claims based Authentication From the top of the page.
      • Choose the port no for the web application.
      • Click on Enable Forms Based Authentication (FBA) Under Claims Authentication Types. Windows Authentication is enabled by default and if you dont need windows authentication then you need to remove the check the box.
      • Add the Membership Provider & Role Manager Name
      • As soon as web application has been created please verify the Authentication Provider settings for the web application. I have the screenshot below:

clip_image002

Note:- If you want to use Windows Authentication and Forms Based Authentication in Single URL then you have to select Enable Windows Authentication and Enable Forms Based Authentication.

image

Note:- Just for understanding, i am using Membership Provider as “SQL-MembershipProvider” and Role Manager as “SQL-RoleManager”. You can use different names, however you need to remember the name so that you can refer them in web.config files. These names are case sensitive.

B. What if you already have a Web application created using Classic Mode Authentication or How to convert Web application from Classic Mode authentication to Claims based Authentication?

You don’t have to delete that web application. You can convert that web application from classic mode authentication to claims based authentication. However this can only be done using PowerShell and it’s an irreversible process. Follow PowerShell commands to convert the web application from Classic Mode Authentication to Claims based Authentication:

$App = get-spwebapplication “URL”

$app.useclaimsauthentication = “True”

$app.Update()

Example:-

$App = get-spwebapplication “http://sp1:8000”

$app.useclaimsauthentication = “True”

$app.Update()

Once you have the web application using Claims Based Authentication, you can create a site collection. Now if you access the web application, you can access the site choosing Windows Authentication or Forms Based Authentication as shown in below image.

clip_image004

Choose windows authentication and login to site. When you login your currently logged in credentials will be used. Make sure the account you are logged in with has access to SharePoint site; Otherwise, you will get access denied error.

II> Configure the Membership Provider and Role Manager.

  • On SharePoint 2010 server open the command prompt.
  • Navigate to C:\Windows\Micrsooft .Net\Framework64\v2.0.50727
  • Run “aspnet_regsql.exe”. This will open ASP .Net SQL Server Setup wizard. On this click on NEXT.

clip_image006

  • Click on “Configure SQL Server for Application Services”.
  • Specify the Database name. If you don’t specify the database name then it will create a database call aspnetdb.

clip_image008

  • Use membershipseeder tool to create the users in SQL database. You can find the tool and information on that from codeplex.

Note:- I have specified the database name as “SQL-Auth”.

III> Modify the web.config file for Membership Provider and Role Manager.

We need to modify 3 different web.config files for FBA to work. Web.config of FBA Web application, web.config of Central Administration Site & Web.config of STS.

A. Modify web.config of FBA web application.

  • Add connection String:

<connectionStrings>

<add name="SQLConnectionString" connectionString="data source=SQL;Integrated Security=SSPI;Initial Catalog=SQL-Auth" />

</connectionStrings>

Connection String has to be added after </SharePoint> and Before <system.web>

  • Add membership Provider and Role Manager:

<roleManager defaultProvider="c" enabled="true" cacheRolesInCookie="false">

<providers>

<add name="c" type="Microsoft.SharePoint.Administration.Claims.SPClaimsAuthRoleProvider, Microsoft.SharePoint, Version=14.0.0.0, Culture=neutral, PublicKeyToken=71e9bce111e9429c" />

<add connectionStringName="SQLConnectionString" applicationName="/" description="Stores and retrieves roles from SQL Server" name="SQL-RoleManager" type="System.Web.Security.SqlRoleProvider, System.Web, Version=2.0.3600.0, Culture=neutral, PublicKeyToken=b03f5f7f11d50a3a" />

</providers>

</roleManager>

<membership defaultProvider="i">

<providers>

<add name="i" type="Microsoft.SharePoint.Administration.Claims.SPClaimsAuthMembershipProvider, Microsoft.SharePoint, Version=14.0.0.0, Culture=neutral, PublicKeyToken=71e9bce111e9429c" />

<add connectionStringName="SQLConnectionString" passwordAttemptWindow="5" enablePasswordRetrieval="false" enablePasswordReset="false" requiresQuestionAndAnswer="true" applicationName="/" requiresUniqueEmail="true" passwordFormat="Hashed" description="Stores and Retrieves membership data from SQL Server" name="SQL-MembershipProvider" type="System.Web.Security.SqlMembershipProvider, System.Web, Version=2.0.3600.0, Culture=neutral, PublicKeyToken=b03f5f7f11d50a3a" />

</providers>

</membership>

</system.web>

B. Modify web.config of the Central Administration web application.

  • Add connection String:

<connectionStrings>

<add name="SQLConnectionString" connectionString="data source=SQL;Integrated Security=SSPI;Initial Catalog=SQL-Auth" />

</connectionStrings>

Connection String has to be added after </SharePoint> and before <system.web>

  • Add membership Provider and Role Manager:

<roleManager defaultProvider="AspNetWindowsTokenRoleProvider" enabled="true" cacheRolesInCookie="false">

<providers>

<add connectionStringName="SQLConnectionString" applicationName="/" description="Stores and retrieves roles from SQL Server" name="SQL-RoleManager" type="System.Web.Security.SqlRoleProvider, System.Web, Version=2.0.3600.0, Culture=neutral, PublicKeyToken=b03f5f7f11d50a3a" />

</providers>

</roleManager>

<membership defaultProvider="SQL-MembershipProvider">

<providers>

<add connectionStringName="SQLConnectionString" passwordAttemptWindow="5" enablePasswordRetrieval="false" enablePasswordReset="false" requiresQuestionAndAnswer="true" applicationName="/" requiresUniqueEmail="true" passwordFormat="Hashed" description="Stores and Retrieves membership data from SQL Server" name="SQL-MembershipProvider" type="System.Web.Security.SqlMembershipProvider, System.Web, Version=2.0.3600.0, Culture=neutral, PublicKeyToken=b03f5f7f11d50a3a" />

</providers>

</membership>

C. Modify web.config of STS. You can locate the STS web.config from %programfiles%\common files\Microsoft Shared\web server extensions\14\WebServices\SecurityToken

<connectionStrings>

<add name="SQLConnectionString" connectionString="data source=SQL;Integrated Security=SSPI;Initial Catalog=SQL-Auth" />

</connectionStrings>

<system.web>

<roleManager defaultProvider="c" enabled="true" cacheRolesInCookie="false">

<providers>

<add name="c" type="Microsoft.SharePoint.Administration.Claims.SPClaimsAuthRoleProvider, Microsoft.SharePoint, Version=14.0.0.0, Culture=neutral, PublicKeyToken=71e9bce111e9429c" />

<add connectionStringName="SQLConnectionString" applicationName="/" description="Stores and retrieves roles from SQL Server" name="SQL-RoleManager" type="System.Web.Security.SqlRoleProvider, System.Web, Version=2.0.3600.0, Culture=neutral, PublicKeyToken=b03f5f7f11d50a3a" />

</providers>

</roleManager>

<membership defaultProvider="i">

<providers>

<add name="i" type="Microsoft.SharePoint.Administration.Claims.SPClaimsAuthMembershipProvider, Microsoft.SharePoint, Version=14.0.0.0, Culture=neutral, PublicKeyToken=71e9bce111e9429c" />

<add connectionStringName="SQLConnectionString" passwordAttemptWindow="5" enablePasswordRetrieval="false" enablePasswordReset="false" requiresQuestionAndAnswer="true" applicationName="/" requiresUniqueEmail="true" passwordFormat="Hashed" description="Stores and Retrieves membership data from SQL Server" name="SQL-MembershipProvider" type="System.Web.Security.SqlMembershipProvider, System.Web, Version=2.0.3600.0, Culture=neutral, PublicKeyToken=b03f5f7f11d50a3a" />

</providers>

</membership>

</system.web>

Above has to be added before </configuration>

IV> Give permissions to users in SQL database.

  • Access Central Administration console and click on manage web applications under Application Management.
  • Select the web application and click on user Policy on ribbon.
  • Click on Add user and select Default Zone.
  • Now type the user name, add the user to the web application by defining appropriate permission.

Common Issues:

If you are using multiple service accounts as per TechNet article Administrative and service accounts required for initial deployment (SharePoint Server 2010) then you might not able to resolve the usernames or add the users to the web application. If you are using 3 different accounts (Farm Administrator account, Application pool account for web application and service application account) then you need to make sure that you have access to the SQL membership database (SQL-Auth).

Important:

What happens to FBA when we upgrade WSS 3.0 / MOSS 2007 to SharePoint 2010?

Before upgrading to SharePoint 2010 you need to remove the changes you have done to the web.config file. As soon as the process of upgrading finishes all the web applications will be upgraded; however, those will use Classic Mode Authentication. You can convert those web applications from Classic Mode Authentication to Claims Based Authentication.

  • ** Note: This FBA configuration method is based upon the pre-release version of SharePoint 2010 and may change in the final release **

    Setup your SharePoint 2010 site

    1. In Central Admin, create a new site. By default, this will use Windows Authentication. Since we haven’t setup FBA yet, we need to setup the Web Application first as a Windows site.
    2. Create the Web Application
    3. Create a default Site Collection, and make a windows user (below we’ve used the Administrator account) a Site Administrator.

    Setup your User Database

    1. Setup the ASP.NET Membership Database. Note: You can use custom membership stores, DotNetNuke, even Live! credentials. But the .NET membership database is very simple to setup. This requires the SQL Server database. You can use the integrated version that is supplied with SharePoint, Express or a fully featured SQL Server (Standard or Enterprise) Edition.
    2. Find the setup file aspnet_regsql.exe located at either of the following locations depending upon your OS:
      %windir%\Microsoft.NET\Framework\v2.0.5027
      %windir%\Microsoft.NET\Framework64\v2.0.5027
    3. When the ASP.NET SQL Server Setup Wizard appears, select “Configure SQL Server for application services”, then click Next
    4. Enter the SQL Server and Database name.
      sqldb
    5. Above, I have named the database FBADB
    6. Click Next and Finish

    Provide Access to the Membership Database

    As an administrator, you’ll be able to add and modify user accounts. But from the SharePoint runtime, we’ll have to provide access to the membership store. This can be done in two ways. If using SSPI (Integrated Security) for the connectionstring from SharePoint, you’ll need to determine the Service Account that runs the Application Pool. Then you’ll provide access to this windows (or service) account in SQL Server to the FBADB database. Or, if you don’t want to use SSPI, or don’t want to take the time to figure out the startup service account for SharePoint you can simply create a login to the FBADB database. Following are steps for the second approach.

    1. Open SQL Server Management Studio (SSMS 2008) and select Security , then Logins
    2. Right Click Logins and Select “New Login”
    3. Create a SQL Server account. Below, we’d created the account FBAService with password pw
      sqluser2
    4. Select “User Mapping”
    5. Mark the checkbox next to FBADB, and select the row.
    6. In “Database role membership”, make the user a dbo_owner.
      rolemember
    7. Click OK to save the new user.

    Setup IIS 7.0 Defaults

    1. Open up Internet Information Services Manager 
    2. Select the Web Server, then double click Connection Strings
      Cstring
    3. Click Add..
    4. Enter the Server (.), Database (FBADB) and the Credentials for the user FBAService (by clicking the Set button). If you want to use SSPI, simpy select “Use Windows Integrated Security” instead.
      cstring2
    5. Click OK to save
    6. Click to Select the Server from the Connections pane again, and double click Providers.
    7. On the Feature dropdown, select .NET Users. Your machine may take a while to respond while the configuration is read.
    8. On the Actions menu, click Add..
    9. On the Add Provider form, select SqlMembershipProvider as the Type
    10. Provide a name: FBA.
    11. Drop down ConnectionStringName and select FBADB
    12. Set any other parameters you’d like. I set some Password related options for user interaction later.
      provider
    13. Click OK to save
    14. From the Feature dropdown, select .NET Roles, then click Add..
    15. Provide a name: FBARole, and select TypeSqlRoleProvider
    16. Select the ConnectionStringName: FBADB
      roleprovider
    17. Click OK to save the .NET role.

    Setup the FBA Zone in SharePoint 2010

    1.  Browse to SharePoint 4.0 Central Administration, Select Security
      centraladmin
    2. In Application Security, select Specify Authentication Providers
      specificauthent
    3. Select the Web Application.
    4. Click the Default Zone.
      defaultzone
    5. Ensure the Web Application is the correct one on the next page!
    6. Change Authentication Type to Forms
    7. Check Enable Anonymous (* note that this does not immediately enable Anonymous access; it merely makes the option available on the front-end web application *
      zone1
      zone2

    1. Click Save.
    2. When the process is finished, the membership provider should now display FBA.

    What SharePoint has done behind the scenes is make the necessary changes to the IIS website to support Forms based authentication. But we still have a little problem. If we browse to the site right now, we won’t be prompted for Windows credentials anymore. Not only do we NOT have a user in the .NET membership database, but we have no FBA based administrators. Let’s tackle that next.

    IIS 7.0 Web Site Configuration for SharePoint 2010 FBA

    1. In IIS Manager, select the SharePoint site. In this example, we used the default site (80).
    2. Double click the .NET Users icon
    3. Click Set Default Provider from the actions pane on the left and select FBA
      dftuser
    4. Click OK to save.
    5. While we’re here, let’s add our first user. This will be used as an administrative account on the FBA site. Click Add..
      newuser
    6. Select a User, Email and Password. Depending upon parameters you defined earlier you may be prompted with challenge/response questions.
      ** The password may require some strength by default. If you receive an error message that states the “password is invalid”, simply add a number or non-alpha character.
    7. Next, select the SharePoint Central Administation v4 web site from the connections menu in IIS.
    8. Click .Net Users, then in the Actions menu select “Set Default Provider” and set that to FBA.

    Set the User as Site Administrator on the SharePoint 2010 Web Site

    1. In SharePoint Central Admin v4, go to Application Management
    2. In the Site Collections section, select “Change Site Collection Administrators
      siteadmins
    3. On the next page, select the Site Collection we’ve been using.
    4. You’ll note that the primary site collection administrator has a little red squiggly. Why? We don’t have Windows Authentication enabled for this site and therefore no way to resolve. Delete the Administator account.
    5. In the field type the user created above (we used fbaadmin), then click the Check Names button. You should see a black underline noting that the name was resolved.
      fbaadmin


    Test the site

    1. In a Web Browser, when you access the site http://localhost (if that’s what you used), you’ll be presented with the SharePoint login screen, not a Windows login pop-up. (Wow, and you thought SharePoint 2007 had a spartan login screen. Get a load of this !)
      login
    2. Login with the fbaadmin credentials and you should be able to access the site.
      homepage2


    Add the reference to the user friendly people picker

    You know the picker…so you can easily find those needles in the haystack. For that to work in Central Admin and this site against your .NET membership database, you need to add a reference to the provider.

    1. In IIS Manager, browse to the Central Admin web application. Explore the folder and find the web.config file. Open in Notepad.
    2. Find the <PeoplePickerWildcards> node and use the following:


    <PeoplePickerWildcards>
    <clear />
    <add key=”FBA” value=”%” />
     </PeoplePickerWildcards>


    Final Note

    If you plan to use the same membership database for multiple sharepoint sites AND you choose to encrypt the passwords, you’ll need to add one final step. In IIS 7,  on the first site, select the Machine Keys icon. Copy those keys. In the next site that you create, you’ll need to use the same machine keys and disable “Automtically Generate” and disable “Generate Unique Key”. This is crucial as the machine key is used to determine the encrypted password that is passed back to the .NET membership database.

This post covers, how to hide the button from the Server Ribbon from SharePoint 2010,

We are going to use the Feature files to hide the SharePoint 2010. First we will create a Feature file and then we’ll create a element file.

Feature.xml


Elements.xml


There was a HideCustomAction element used to hide / remove the button from Server Ribbon Control. If we want to remove particular Button / Group / Tab we have to specify the respective Button’s Location ID on HideActionId attribute.

HideActionId – Specifies the Location ID of the custom action to hide

Location – Specifies the Parent location Id of the custom action to hide.

By using HideCustomAction, we can hide / remove the Button, Group, Tab.

Example

For example I have provided a element.xml for hiding the Upload Multiple button from the Document Library.

Elements.xml


The above xml file, used to remove the Upload Multiple Documents from the Server ribbon on Document Libraries.

I have added the code in codplex, http://iotapsp.codeplex.com/


I’m responsible for a couple of SharePoint 2007 (MOSS) farms where all SharePoint servers showed the following error in the system event log:


Event Type: Error
Event Source: DCOM
Event Category: None
Event ID: 10016
Date: 1/17/2007
Time: 4:31:48 AM
User: <DOMAIN>\sa_adm
Computer: <SERVER>
Description:

The application-specific permission settings do not grant Local Activation permission for the COM Server application with CLSID

{61738644-F196-11D0-9953-00C04FD919C1}

to the user <DOMAIN>\sa_adm SID (S-1-5-21-162740987-2502514208-3469184634-1119). This security permission can be modified using the Component Services administrative tool.

For more information, see Help and Support Center at http://go.microsoft.com/fwlink/events.asp.

The error would show up at regular intervals in clusters (4-12 at roughly the same time) and there would be a few more with other usernames and other class id’s. I had two fully functional farms with 3 SharePoint servers each and a number of standalone development machines. They all exhibited similar behavior.

The error listed above is that the user running the Central Administration web application doesn’t have access to activate (instantiate) the IIS WAMREG admin Service object (search the registry for the CLSID).

Strangely enough I didn’t observe any functional errors in the farms as a result of these errors – nothing seemed amiss (plenty of stuff didn’t work but none directly related to this).

An important note here is that the service users used in the farm are all standard domain accounts and only given additional local rights by the SharePoint installer and Central Administration (The one exception is that “aspnet_regiis -ga IIS_WPG” was executed after SharePoint install and initial configuration).

The following procedure removes the errors from the event log without compromising the entire security setup (yes, assign administrative rights for the service users would do the trick too) and has been verified by Microsoft consulting services.

On each SharePoint server do the following:

  1. Click Start, Click Run, type “dcomcnfg” and click ok
  2. Expand Component Services / Computers / My Computer / DCOM Config

  3. Right click IIS WAMREG admin Service and choose Properties
  4. Click the Security tag
  5. Click Edit under Launch and Activation Permissions

  6. Click Add
  7. In the Select Users, Computers or Groups type computername\WSS_WPG and
    computername\WSS_ADMIN_WPG

  8. Click ok
  9. In the Permissions for UserName list, click to select the Allow check box

  10. Click Ok twice.
  11. Go back to the main Component Services window, right click the “netman” node and select Properties
  12. Click the security tab
  13. Click Edit under Activation Permissions
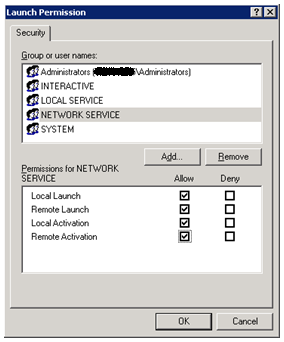
  14. Click Add on the Launch Permissons Dialog
  15. Enter “NETWORK SERVICE” in the edit box
  16. Click Ok
  17. Enable all the checkboxes for the NETWORK SERVICE

  18. Click Ok twice
  19. Finally, run “IISReset”

That should be it!

A little less event log errors to worry about – there are plenty left on a reasonable complex SharePoint farm…

As a side note: The above error also shows up in other applications as well – I’ve heard about it for exchange servers as well and more applications are probably affected. In that case you’ll need to search the registry for the actual DCOM application and assign the rights to another local group (or username as a last resort).

http://soerennielsen.wordpress.com/2007/04/16/fixing-those-pesky-dcom-event-log-error-10016-in-a-sharepoint-farm-environment/


Here is a Code snippet for retrieving user profile picture using Client Object model – ECMAScript . I am passing the userId from the front end to a javascript method called “getUserProfile()” to retrieve the user profile info. The method onQuerySucceeded will get you the user Profile info.

function getUserProfile(userID)
{
var clientContext = new SP.ClientContext.get_current();

var web = clientContext.get_web();

var userInfoList = web.get_siteUserInfoList();

var camlQuery = new SP.CamlQuery();

camlQuery.set_viewXml(‘<View><Query><Where><Eq><FieldRef Name=\’ID\’/>’ +’<Value Type=\’Number\’>’ + userID + ‘</Value></Eq>’ +

‘</Where></Query><RowLimit>1</RowLimit></View>’);

this.collListItem = userInfoList.getItems(camlQuery);

clientContext.load(collListItem);

clientContext.executeQueryAsync(Function.createDelegate(this, this.onQuerySucceeded),Function.createDelegate(this, this.onQueryFailed));
}

function onQuerySucceeded(sender, args)
{

var item = collListItem.itemAt(0);

var profile = item.get_item(‘Notes’);

var pictureUrl = item.get_item(‘Picture’).get_url();

var userImage = document.getElementById(‘myImageContainer’); -> Image object

userImage.src = pictureUrl;

var profileDiv = document.getElementById(‘userProfileContainer’);

profileDiv.innerHTML = profile;
}

This screen cast demonstrates how to change the behavior of opening PDF files and other un-trusted files served from SharePoint 2010.  

A Web Applications General Settings allow you to change the File Handling as it’s serviced from SharePoint to the clients IE 8 Browser.  By default the X-Download-Options of the MIME-Handling header is set to Force Save or noopen. To change the behavior set the Browser File Handling to Permissive rather than Strict to allow the file to be open in the browser.

http://vimeo.com/13350185

Browser File Handling 
Specifies whether additional security headers are added to documents served to web browsers. These headers specify that a browser should show a download prompt for certain types of files (for example, .html) and to use the server's specified MIME type for other types of files.

  • Permissive Specifies no headers are added, which provides a more compatible user experience.
  • Strict Adds headers that force the browser to download certain types of files. The forced download improves security for the server by disallowing the automatic execution of Web content that contributors upload.


- 출처 URL : http://www.borghoff.com/post/2010/07/14/SharePoint-2010-Document-File-Open-Behavior.aspx


private static void EnablingAlternateLanguages(SPSite site, SPWeb web)
{
    SPWebTemplateCollection templates = site.GetWebTemplates(web.Language);
    SPWebTemplate template = templates[web.WebTemplate];

    if (template.SupportsMultilingualUI)
    {
        web.IsMultilingual = true;

        SPLanguageCollection installed = SPRegionalSettings.GlobalInstalledLanguages;
        IEnumerable supported = web.SupportedUICultures;

        foreach (SPLanguage language in installed)
        {
            CultureInfo culture = new CultureInfo(language.LCID);
            if (!supported.Contains(culture))
            {
                web.AddSupportedUICulture(culture);
            }
        }
    }
}

방화벽 설정이 되어 있는 웹 서버에서

80 포트가 아닌 별도의 포트로 웹 응용 프로그램 생성하면

외부에서 사이트 접근이 되지 않아 당황스러울 경우가 있습니다.


Windows Server 2008에 SharePoint 설치 시,

80포트와 중앙관리 포트 및 웹 서비스 등 기본적인 것에 대해서는 인바운드 규칙에 추가되어 예외 처리되어 있지만,

별도의 포트의 경우 수동으로 추가 해주셔야 합니다.


[규칙 추가 방법]

1.     제어판에서 시스템 및 보안 방화벽 상태 확인(Windows 방화벽) “을 클릭합니다.

2.     좌측 메뉴의 고급 설정에 들어갑니다.

3.     인바운드 규칙에 보시면 아래와 같이 기본 포트에 대해서는 규칙 추가되어 있는 것을 볼 수 있습니다.


4.     새 규칙을 클릭 하여, 포트 선택합니다.


5.     TCP 선택, 특정 로컬 포트에 웹 응용 프로그램 포트를 지정합니다.


6.     연결 허용을 선택합니다.


7.     규칙 적용되는 시기를 선택합니다. (필자는 전체 선택함)


8.     규칙에 대한 이름 및 설명 적어 주시면 됩니다.


SharePoint 2010에서 사용자 별로 다국어 지원 기능이 추가 되었습니다.

[SharePoint 2010 다국어 지원 설정]

다국어 설정은 사이트 단위로 설정 하게 됩니다.


 * 언어 선택시 lcid 의 쿠키 값에 현재 설정된 언어 코드가 설정됨 (한글 : 1042 , 영문 :1033, 일본어 : 1041)


"Lcid" 쿠키에서 현재 사용자가 설정한 언어 코드를 읽어와 Resources 폴더에 존재 하는 Resources파일을 기준으로 언어 설정을 변경 합니다.


Custom Field 다국어 설정 시 static name으로 필드 생성 합니다


Display Name 설정을 다음과 같이 Resources 파일과 키를 설정해 주시면

Core Resources 파일의 objectiv_schema_mwsidcamlidC24 키로 설정된 언어 값을 가지고 옵니다.

$Resources:core,objectiv_schema_mwsidcamlidC24; 


Visual Studio 2010 개발 툴에서 SharePoint 2010 개발 시,

SPSite 객체를 가져오는데 아래와 같은 FileNotFoundException이 발생하여 당황스럽게 하는 경우가 있습니다. (사이트는 실제로 존재) 


실행 소스

using (SPSite site = new SPSite("http://shing208"))

using (SPWeb web = site.OpenWeb()) { }


에러 메시지

FileNotFoundException

The Web application at http://shing208 could not be found. Verify that you have typed the URL correctly. If the URL should be serving existing content, the system administrator may need to add a new request URL mapping to the intended application.


원인 및 해결책(체크 사항)

SharePoint 2010 버전은 64비트만 지원하는데, 개발 진행시 빌드 옵션 사항이 32비트로 지정되어 있어 발생하였습니다.

해결 방법은 아래 이미지와 같이 프로젝트 속성으로 들어가, 빌드 플랫폼 타켓을 x64로 변경해주시면 됩니다.


RSS is a great thing. It streamlines easily the communication between a content provider and its readers. RSS nowadays are everywhere. News sites, blogs, content driven sites. By subscribing to a RSS feed you can reach a broader audience by eliminating the need of a computer, just have a mobile with RSS reader capabilities and you are good to go. As a powerful content management tool, of course SharePoint enables RSS syndication for its contents.

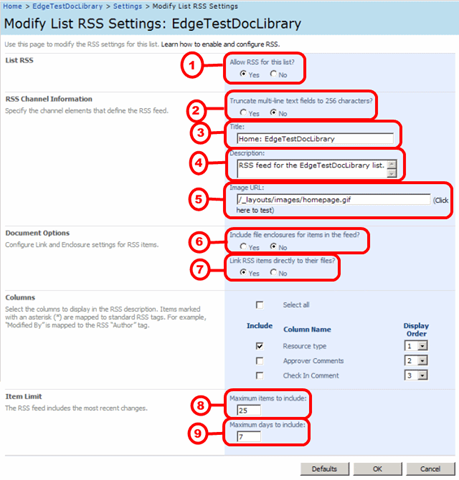
Let’s take a look at the UI page where we can configure the RSS feed of a document library:

sharepoint-configure-rss-setting

So, can we customize the RSS features exposed by a SharePoint library programmatically ? The answer is yes, but unfortunately this task is not as straight forward as one might think.

If you look the SPList properties, you will not find anything related to them. If you look at the SPListItems, you will not find anything related to them.

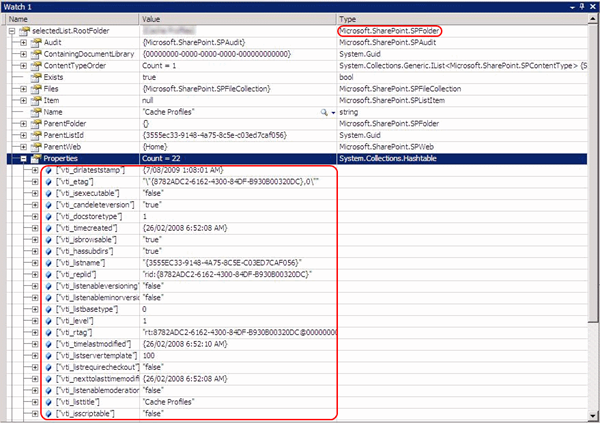
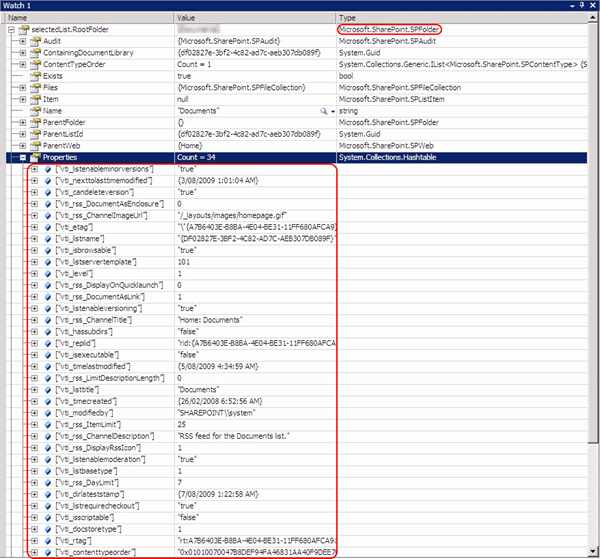
So where are these properties? They are in fact in the RootFolder property of the list. The RootFolder is an object of type SPFolder and sets various properties for the files and contents associated with the list as a collection of items.

And guess where these RSS feeds settings are specified? Yes, in that same collection, exposed as a key-value pair. But even if you try to inspect that with your preferred tool, you won't be able to see it clearly. Not even with SharePoint Manager sometimes. For example, take a look at these 2 RootFolders properties, from 2 different SPLists, being visualized with SharePoint Manager.

spm-sharepoint-manager-splist-rss-2

spm-sharepoint-manager-splist-rss-1

So…You see, the first one does not expose any RSS related property values, but the other one does. That's because the later has  SPListTemplateType.DocumentLibrary as its base type.

Since the SharePoint operations and behaviours rely extremely on the exposed APIs, we would assume these are the kind of stuff you would have access via an API call. I for one was not expecting to modify straight into the property values of a key-value par exposed by a SharePoint collection itself. Yeah, pretty tricky. SharePoint does its own things by its own ways. 
Anyway, these are the things you can modify from our RSS settings screen:


sharepoint-configure-rss-setting2

1) EnableSyndication : internal property, refer to the code below

2) vti_rss_LimitDescriptionLength : Controls if the item content will be exposed complete in the feed of just the first 256 characters.

3) vti_rss_ChannelTitle : name the RSS feed

4) vti_rss_ChannelDescription : Short text to describe the feed

5) vti_rss_ChannelImageUrl : Specifies which image will be displayed when a RSS reader consumes the feed

6) vti_rss_DocumentAsEnclosure : Indicates if will any documents associated with the feed are included as enclosure. ( I assume, becaue I have not tested that to explain better )

7) vti_rss_DocumentAsLink : Indicates if you can expose the documents included in the feed as link direct to the file. Very common for podcast RSS feeds, for example.

8) vti_rss_ItemLimit : Limits how many items are going to be exposed in the feed

9) vti_rss_DayLimit : Limits how many days will the feed content display. This will work combined with the vti_rss_DayLimit; the most restrictive one, wins.

Also there are some more fields that are not exposed by the UI, but still exists in property collection:

vti_rss_DisplayRssIcon : Indicates if the image in the vti_rss_ChannelImageUrl is an icon file. It will be displayed in the navigation bar of web browsers, for example.

vti_rss_DisplayOnQuickLaunch : I did not test that, but I imagine it will add the feed to the quick launch links in the homepage.

After all the settings were done, there is one more catch: Call the Update() method not from the list, but from the RootFolder object

public void ApplyRSSSettings(Microsoft.SharePoint.SPList selectedList)
{
    // display RSS for this list
    selectedList.EnableSyndication = true;

    // set NO to truncate RSS multiline text to 256 chars
    selectedList.RootFolder.Properties["vti_rss_LimitDescriptionLength"] = 0;

    // set NO to include file enclosures
    selectedList.RootFolder.Properties["vti_rss_DocumentAsEnclosure"] = 0;

    // set YES to link rss to files
    selectedList.RootFolder.Properties["vti_rss_DocumentAsLink"] = 1;

    // set RSS maximum items to 25
    selectedList.RootFolder.Properties["vti_rss_ItemLimit "] = 25;

    // set RSS maximum days to 7
    selectedList.RootFolder.Properties["vti_rss_DayLimit"] = 7;

    // commit the changes to the list
    selectedList.RootFolder.Update();
}


인터넷 브라우저나 OWA 에서 문서 URL를 클릭시 읽기 전용으로 열리게 된다.

브라우저 보안상 문서를 편집 모드로 열도록 해주는 스크립트가 디폴트로 동작을 하지 않게 되어 있다고 한다.

디폴트를 풀어주는 방법으로 아래와 같은 레지스트리 키를 수정하면 된다.
(단, 오피스 2003 에서는 적용되지 않는다.)
[HKEY_CURRENT_USER\Software\Microsoft\Office\12.0\Common\Internet]
"OpenDocumentsReadWriteWhileBrowsing"=dword:00000001


Once I was working with a custom search webpart issue in which search was implemented by using FullTextSqlQuery method, but it was not returning any results whenever we use contains predicate to filter the date time type columns.

There was a custom managed property of type Date Time to filter in the custom webpart. Since it was not returning any results in the custom webpart, we added that managed property in OOB advance search web part to include the custom managed property in the pick property section. After that, selected the date time managed property and executed the search by giving the same value that we given in the custom search webpart and it returned the correct results. We also checked the ULS logs to check the query used to execute the search with the date time type managed property in the filtering condition.

We saw that there is a difference in the construction of query between the custom webpart and the query executed in OOB (out-of-the-box).

SharePoint has only 3 filtering conditions with any managed property of type Date and Time. So, we must need to construct a query in a way that SharePoint can internally understand. If you pass ‘07/08/2009’ as your input date value SharePoint will convert that input date value in the format of ‘2009/07/08 18:30:00’ internally. You can see the query in the ULS logs once you execute a search in UI.

I have captured the SQL syntaxes for all the three filtering conditions. (eg: 07/08/2009 as our input date value)


Equal

Full Text Query: SELECT WorkId, Rank, Title, Author, Size, Path, Description, Write, SiteName, CollapsingStatus, HitHighlightedSummary, HitHighlightedProperties, ContentClass, IsDocument, PictureThumbnailURL  from scope() where ("scope" = 'All Sites') And ((Created >= '2009/07/07 18:30:00' and Created < '2009/07/08 18:30:00'))


Earlier than

Full Text Query: SELECT WorkId, Rank, Title, Author, Size, Path, Description, Write, SiteName, CollapsingStatus, HitHighlightedSummary, HitHighlightedProperties, ContentClass, IsDocument, PictureThumbnailURL  from scope() where ("scope" = 'All Sites') And (Created < '2009/07/08 18:30:00')


Later than

Full Text Query: SELECT WorkId, Rank, Title, Author, Size, Path, Description, Write, SiteName, CollapsingStatus, HitHighlightedSummary, HitHighlightedProperties, ContentClass, IsDocument, PictureThumbnailURL  from scope() where ("scope" = 'All Sites') And (Created > '2009/07/08 18:30:00')

You can refer the above syntaxes for building your SQL query for filtering date type managed properties.


When you open a document that is hosted in a SharePoint document library in Word 2007, by default the document is shown with its metadata information from the library columns. I was looking for a way to hide this information by default each time I open a document from the server, but couldn’t find where to set this in the available Word Options .

Please note that the information panel can only be hidden through MOSS, not if you run WSS3 only. The documentation can be vague about it, and I wanted to accomplish this also for a WSS3 site after doing this successfully in MOSS. If you want to find out more details about this, please read this discussion.

I asked a Word expert at work, Jeremy, who hadn’t come across the issue before, but who obviously is a better googler than myself and he pulled up the solution — it is actually set on the SharePoint side of things, not from within Word.  The reason why I couldn’t come up with any relevant google results is that I did not know what this info area was called.  Jeremy found this important piece of the puzzle by hovering over the closing x at the top right corner of the panel — it’s called Document Information Panel. So what I need to do is to hide this panel by changing the Document Information Panel settings for a content type(Microsoft detailed instructions)

Here’s a screenshot of the default word behavior:

ms-word07-docinfopanel1

Hiding the Document Information Panel by default

  1. Select the Settings menu of the document library
  2. Under Content Types, click the name of the content type you want to change. 
    Important:  If you don’t have content types enabled, you will not be able to change the settings for the document information panel. If you have them enabled, skip to step 4.
  3. To enable content types, go to Advanced Settings of the library and set the radio button for Allow manage content types? to yes.
  4.  Under Settings, click on the title of the content type you want to modify.
  5. On the content type’s Settings screen, click Document Information Panel settings. 
    Content type settings page

    Content type settings page

  6. On the Document Information Panel settings page, clear the checkbox for “Always show Document Information Panel on document open…”
    document info panel checkbox

    document info panel checkbox

Voilà! No more property  info when  by default when you open the document.

To make the Document Info Panel visible again for the current document in Word, select Prepare>Properties from the Office button:

show document info panel from Prepare menu

show document info panel from Prepare menu


SharePoint has a cool and great facility called Quota templates. In order to get this facility in UI, you have to do the following. Refer: http://technet.microsoft.com/en-us/library/cc263223.aspx

Enable the site collection quotas in the central administration site – under application management.

clip_image002

Once you click on the “site collection quotas and locks” you will be redirecting to another page and there you can set your quota template and lock status.

clip_image004

Once you enable this one, then you can see a new link under the site collection administration section of your site.

clip_image006

Once you click on that link it will redirect to another beautiful page which is given below.

clip_image008

In the above page we can see all document libraries, documents and lists by selecting the “show only” drop down. Also here we can filter the result using the “Show items” drop down and also we can sort the list items using “Sort By” drop down.

The list will show the name of the list or library and the corresponding size and related information. Now we can see how we can retrieve this information through code. The below code is self explanatory and I believe it won’t confuse you any more J

We can go with the code if you want to create a custom view representation of this detail. Also it will help us if you want to get this information anywhere in your custom application.

   1: SPSite oSite = new SPSite("http://blr3r7-19c:13774/sites/testwp");
   2: DataTable oDtRawData = null;
   3:             
   4: // this line of code will return the stroage information of all the document lirbaries in this site
   5: oDtRawData = oSite.StorageManagementInformation(SPSite.StorageManagementInformationType.DocumentLibrary,SPSite.StorageManagementSortOrder.Increasing, SPSite.StorageManagementSortedOn.Size,100);
   6:  
   7: // this line of code will return the stroage information of all the lists in this site
   8: oDtRawData = oSite.StorageManagementInformation(SPSite.StorageManagementInformationType.List, SPSite.StorageManagementSortOrder.Increasing, SPSite.StorageManagementSortedOn.Size, 100);
   9:  
  10: // this line of code will return the stroage information of all the Documents in this site
  11: oDtRawData = oSite.StorageManagementInformation(SPSite.StorageManagementInformationType.Document, SPSite.StorageManagementSortOrder.Increasing, SPSite.StorageManagementSortedOn.Size, 100);
  12:             
  13: // if you wan to see column names, loop through all the columns and find out the names and grab the needed one. 
  14: foreach (DataColumn oColumn in oDtRawData.Columns)
  15:    {
  16:             Console.WriteLine(oColumn.ColumnName);                
  17:    }
  18: Console.ReadLine();
  19:  
  20: // loop through all the rows and find out the values. Here the size will be return in bytes (size/1024 = size in KBs)
  21:   foreach (DataRow oRow in oDtRawData.Rows)
  22:    {
  23:          Console.WriteLine(oRow["Title"].ToString() + " : " + oRow["Size"].ToString() + " : " + oRow["LeafName"].ToString());               
  24:    }
  25:  
  26: Console.ReadLine();  
 

+ Recent posts