2.1 조작하려는 엘리먼트 선택하기

  • jQuery는 우리에게 익숙한 CSS문법을 사용한다.
  • jQuery 정의 메서드 역시 CSS문법을 확장해서 사용한다.

2.1.1 기본 CSS 셀렉터 사용하기

  • a - 모든링크(<a>) 엘리먼트와 일치하는 셀렉터
  • #specialID - specialID를 아이디로 가지는 엘리면트와 일치 셀렉터
  • .specialClass - specialClass를 클래스로 가지는 셀렉터
  • a#specialID.specialClass - 아이디가 specialID이고 specialClass를 클래스로 가지는 링크와 일치하는 셀렉터
  • p a.specialClass - <p> 에리먼트 내에 선언되고 specialClass를 클래스로 가지는 모든링크와 일치하는 셀렉터
  • 몇몇 예외사항을 제외하고 CSS3를 완벽하게 준수한다.

2.1.2 자식셀렉터, 컨테이너 셀렉터, 어트리뷰트 셀렉터

  • p > a - 자식셀렉터
  • a[href^=http://] - 어트리뷰트 셀렉터 (^)는 값의 시작부분이 일치함을 의미함
  • form[method] - 특정 어트리뷰트를 가진 셀렉터 선택
  • input[type=text] - 일치하는 어트리뷰트를 가짐
  • a[href$=.pdf] - 끝값이 일치하는 어트리뷰트 셀렉터
  • a[href*=jquery.com] - 문자열을 포함하는 어트리뷰트 셀렉터
  • li:has(a) - <a>엘리먼트를 포함하는 모든 <li>엘리먼트와 일치한다.

2.1.3 위치로 선택하기

  • :first - 첫번째 일치 엘리먼트
  • :last - 마지막 일치 엘리먼트
  • :first-child - 첫번째 자식 엘리먼트
  • :last-child - 마지막 자식 엘리먼트
  • :only-child - 형제가 없는 엘리먼트
  • :nth-child(n) - n번째 자식 엘리먼트
  • :nth-child(even|odd) - 짝수 또는 홀수 자식 엘리먼트
  • :nth-child(Xn+Y) - 공식에 따른 엘리먼트 ex)li:nth-child(3n)
  • :even / :odd -  짝수 홀수 엘리먼트
  • :eq(n) - n번째 일치 엘리먼트 (인덱스 0부터 시작)
  • :gt(n) - n번째 엘리먼트(포함되지 않음) 이후의 엘리먼트와 일치
  • :lt(n) - n번째 엘리먼트(포함되지 않음) 이전의 엘리먼트와 일치
  • 자식셀렉터는 1부터 시작

2.1.4 jQuery 정의 셀렉터 사용하기

  • :animated - 에니메이션 적용된
  • :button - 모든 버튼
  • :checkbox - 체크박스엘리먼트
  • :checked - 선택된 체크박스
  • :contains(foo) - 문자열 foo를 포함하는 엘리먼트
  • :disabled - 비활성화 상태인 모든 폼엘리먼트
  • :enabled - 활성화 상태인 모든 폼엘리먼트
  • :file - 파일엘리먼트
  • :header - 헤더 엘리먼트
  • :hidden - 감춰진 엘리먼트
  • :image - 폼 이미지 선택
  • :input - 폼 엘리먼트만 선택(input, select, textarea, button)
  • :not(filter) - 필터의 값을 반대로 변경
  • :parent - 빈 엘리먼트 제외 텍스트포함 자식엘리먼트를 가지는 엘리먼트
  • :password - 패스워드 엘리먼트
  • :radio - 라디오 버튼
  • :reset - 리셋 버튼
  • :selected - 선택된 엘리먼트
  • :submit - 전송 버튼
  • :text - 텍스트 엘리먼트
  • :visible - 보이는 엘리먼트

2.2 새로운 HTML 생성하기

  • $("<div>안녕</div>")
  • $("<div>") 는 $("<div></div>")와 같다
  • .appendTo() 메서드도 있다.

2.3 확장된 엘리먼트 집합 관리하기

2.3.1 확장된 집합의 크기 결정하기

  • $('#someDiv').html('페이지에는 총 '+$('a').size() + '개의 링크가 있다');
  • 확장집합의 엘리먼트 개수

2.3.2 확장 집합에서 엘리먼트 획득하기

  • $('img[alt]')[0] - 배열을 이용
  • $('img[alt]').get(0) - 위와 동일. 0 생략시 배열 반환
  • $('img').index($('img#findMe')[0]) - 이미지들중 id가 findMe인 이미지가 몇번째인지 인덱스를 반환

2.3.3 확장 엘리먼트 집합 재편성하기

  • $('img[alt]').add('img[title]') - 엘리먼트를 확장집합에 추가한다.
  • $('p').add('<div>안녕!</div>') - 새 html 생성해서 추가
  • $('img'[title]').not('[title*=puppy]') - title 어트리뷰트를 지닌 모든 img엘리먼트 선택할때 puppy를 포함은 제외(true를 제외)
  • $('img').addClass('seeThrough').filter('[title*=dog]') - not 메서드와는 반대의 결과 (부합하지 않는 false를 제외)
  • $('*').slice(0,4); - 전체 엘리먼트에서 처음부터 4개의 엘리먼트를 포함한 집합생성
  • $('*').slice(4); - 4개 이후(5번째 부터)에서 끝까지의 확장 집합생성

2.3.4 관계를 이용해 확장집합 얻기

  • children() - 고유한 자식으로 구성된 확장집합 반환
  • contents() - 엘리먼트 콘텐츠로 구성된 확장집합 반환. 주로 iframe 엘리먼트 콘텐츠를 얻고자 함(텍스트 노드포함)
  • next() - 확장집합내의 각 확장 엘리먼트 바로 다음에 나오는 형제
  • nextAll() - 확장집합내의 각 확장 엘리먼트 다음에 나오는 모든 형제
  • parent() - 모든 확장 엘리먼트의 바로 위 부모로 구성된 엘리먼트
  • parents() - 모든 확장 엘리먼트의 조상으로 구성된 확장집합 반환(root 미포함)
  • prev() - 각 확장 엘리먼트 바로 이전 형제로 구성된 확장집합
  • prevAll() - 각 확장엘리먼트 이전에 나오는 모든 형제로 구성된 확장집합
  • sibilings() - 확장 엘리먼트의 모든 형제를 포함하는 확장집합을 반환

2.3.5 확장집합을 이용하는 기타 방법들

  • wrappedSet.find('p cite') - wrappedSet 집합에서 <p>에 포함된 <cite>엘리먼트 구성 확장집합
  • var hasImage=$('*').is('img'); - img 엘리먼트가 있는지 true false 반환

2.3.6 jQuery 체인 관리하기

  • $('img').clone().appendTo('#somewhere').end() - appendTo() 이전 확장 집합으로 돌아간다.
  • andSelf() - 커멘드체인에서 이전 확장집합 두개를 하나로 합친다.


1.1 jQuery인가?

1.2 튀지 않는 자바스크립트

  •  쉽게 동작을 분리해 낼 수 있도록 라이브러리를 설계 
  • 튀지 않는(unobstrusive) 자바스크립트는 HTML 페이지의 <body>테그에 포함된 자바스크립트 표현식이나 구문을 잘못된 것으로 본다. 
  • 이는 명확하게 책임을 분리해주지만 많은 코드를 짜야하는 비용이 따른다. 
  • jQuery를 이용하면 튀지 않는 자바스크립트 적용한 페이지를 작성하는 일이 한층 쉽고 즐거운 작업이 될 수 있다. 
  •  적은 코드로 코딩이 가능하다.

1.3 jQuery 기초

1.3.1 jQuery() 함수

  • p a  -  <p> 엘리먼트에 포함된 모든링크(<a> 엘리면트)의 그룹을 참조한다.
  • CSS에서 사용되는 일반적인 셀렉터 이외에도 대부분의 브라우저에서 아직 완벽히 구현하지 못한 강력한 셀렉터도 지원한다. CSS3도 지원
  • $()는 jQuery() 함수의 별칭
  • $("div.notLongForThisWorld").fadeOut() -> 사라지게 한후 동일한 엘리먼트 그룹 반환
  • $("div.notLongForThisWorld").fadeOut().addClass("removed"); -> 무한대로 연결가능
  • $("#someElement").html("엘리먼트에 텍스트를 추가한다."); -> 작업이 복잡할 수록 jQuery체인을 사용하면 우리가 원하는 결과를 얻는데 필요한 코드의 양이 확연히 준다.
  • $("#someElement")[0].innerHTML = "엘리먼트에 텍스트를 추가한다."); -> 배열처럼 사용 할 수 있다.

1.3.2 유틸리티 함수

1.3.3 문서 준비 핸들러

  • window.onload는 DOM트리 생성 후 모든 이미지와 다른 외부리소스까지 로드 후에야 실행되므로 이미지나 다른 리소스를 로드하는데 시간이 오래걸리게되면 방문자가 그만큼 기다려야 하므로 전체 페이지에 사용 하기는 어렵다.
  • jQuery는 크로스 브라우져 환경으로 이를 지원
  • $(document).ready(function){     }); - ready()메서드를 통해 ready상태가 되었을때 호출
  • $(function({       }); - DOM이모두 로드될 때까지 코드실행을 기다린다. 문서내에 여러번 사용 가능
  • window.onload는 오직 한 함수만 허용한다.

1.3.4 DOM 엘리먼트 생성하기

  • $("<p>안녕!</p>").insertAfter("#followMe");

1.3.5 jQuery 확장하기

  • jQuery 라이브러리에는 필요한 기능만을 포함시켰다.
  • 필요한 기능을 확장해서 사용 가능하다.
  • $("form#myForm input.special").disable();
  • $.fn.disable = function() {                                                             // disable 함수를 추가하겠다.

retun this.each(function() {

    if (typeof this.disabled != "undefined") this.disabled = true; // this는 위와 다른 this

});

}

1.3.6 다른 라이브러리들과 함께 jQuery 사용하기 


 1.     데이터베이스 파일과 로그 파일은 별도의 드라이브로 분리한다.

è  IO를 분산하여 병목현상을 감소시킨다.


2.     Ad Hoc 쿼리 (동적 쿼리) : 정적 쿼리로 대체

è  코드의 실행 시점에 SQL 문이 동적으로 구성되고 실행되는 쿼리

è  문제점 : 실행 시마다 컴파일을 반복하게 됨으로 Cache 재사용을 저해함으로써 CPU, Memory 등 여러가지 문제 발생

è  SP의 이점

n  실행 계획 Caching 을 통한 성능 이득

n  Network Traffic 최소화

n  출력 Parameter, Return 값 사용

n  Ownership Chain 을 통한 권한 처리, SQL Injection 차단 등의 보안 기능

n  업무 논리의 캡슐화, 모듈화

n  SQLXML 3.0 이후 릴리스에서 XML WebService 노출 기능

è  SP 안에 동적 쿼리 형태로 작성 하지 않는다.


3.     인덱스 생성 Guide

è  where절에서 자주 사용되는 컬럼

è  between A and B (클러스터인덱스가 유리) : 범위 쿼리 문에서는 클러스터 인덱스가

유리 하다.

è  order by가 항상 사용되는 컬럼

è  join으로 자주 사용되는 컬럼

è  100만건 중에 10개 조회 OR 1000개 조회와 같이 찾는 것이 적은 컬럼 : 중복 데이터가 많은 (조회되는 것이 많은) 컬럼은 인덱스에 좋은 영향은 아님.

è  인덱스로 인해 얻는 손해 : H/W 용량 증가, DML(Data Manipulation Language : INSERT, UPDATE, DELETE) Performance 저하 (특히 INSERT)


4.     쿼리 Guide

è  WHERE 절에 가공 컬럼 비교 금지 : WHERE REPLACE(USER_ID, ‘ ’, ‘’) = ‘11111’ 와 같이 컬럼을 가공하게 되면 인덱스를 사용하지 못한다. - INSERT USER_ID에는 ‘ ‘ INSERT 되지 않도록 하고, 조건절은 WHERE USER_ID = ‘11111’

è  WHERE 절에서 LIKE 사용 시 ‘%’ 로 시작하는 비교 금지 : NAME LIKE '%홍길동%' 와 같이 LIKE ‘%’로 시작하는 비교는 TABLE SCAN 한다. - 해당 TABLE의 데이터 건수가 소량이고 일정량을 유지한다면 시스템 Capacity내에서 사용 가능하나 일정량의 데이터가 주기적으로 증가하고 해당 쿼리가 빈번히 사용되는 쿼리라면 '%홍길동%' 기능을 '홍길동%' 으로 바꾸던가 시스템 Capacity 를 고려하여 데이터를 삭제하여야 한다.

è  SELECT 절에 사용자 정의 함수 사용 : 무조건 사용하지 않는다. – join 으로 변경

è  SELECT 절에 하위쿼리 사용 : 무조건 사용하지 않는다. – join 으로 변경

è  잠금 문제 : SELECT 쿼리에 with (nolock) 혹은 with (readuncommitted) Hint 사용 – Commit 되지 않은 데이터를 읽어 나중에 없어지거나 변경될 수 있으나 회계와 같은 중요한 데이터가 아니라면 반드시 사용한다.

SQL Server 의 기본 격리수준은 read committed 이다. 그래서 읽을 때는 공유 잠금이 유지되어, 테이블을 SELECT 할 경우 INSERT, UPDATE등은 BLOCK 된다. 이럴 경우 SELECT DB의 성능이 떨어지게 된다.

각 구문에 적용을 해야 하는 불편함을 해결하는 방법은 SP 상단에 아래 문구를 삽입한다.

SET TRANSACTION ISOLATION LEVEL READ UNCOMMITTED

è  Ad Hoc 쿼리 : 정적 쿼리로 변경 (SP)

è  SELECT * 을 사용하는 것은 피한다. : 사용하지 않는 데이터를 호출하는 것만으로도 이미 많은 부하가 생긴다. 특히 text 타입의 데이터를 호출하는 경우는 그 정도가 심해진다. - 필요한 컬럼만 SELECT 한다.

è  COUNT(*)을 사용하라. : COUNT(컬럼)으로 호출하는 경우가 있다. 이 경우 해당 컬럼의 NULL값을 제외한 COUNT를 가져오게 된다. NULL값을 일일이 체크하면 호출 속도가 저하되게 된다. NULL을 체크해야 하는 경우가 아닌 대부분의 경우 COUNT(*)을 사용한다. COUNT(*) NULL값의 경우도 모두 count에 추가하지만 그로 인해 성능의 저하가 많이 줄어든다.

è  1 row 만 필요하다면 TOP 1을 사용한다.

è  커서 및 임시테이블의 내용을 최대한 자제하라. : 커서보다는 임시 테이블이, 임시테이블 보다는 테이블 변수를 사용하는 것이 성능에 좋다.

è  뷰의 사용을 줄여라. : 직접 쿼리가 단계를 줄이므로 가급적 뷰를 사용하지 않는다.

è  JOIN을 사용하는 경우 INNER JOIN을 되도록 사용하라.
.
동일한 효과를 가지는 쿼리를 작성할 경우 INNER JOIN이 아닌 LEFT OUTER JOIN을 쓰는 경우가 있다. (습관적으로?) 확연히 속도가 차이가 나므로 INNER JOIN을 사용하는 것이 좋다.

è  반드시 인덱스를 사용하도록 한다. : 실행 계획을 통해 인덱스의 사용 유무와 올바른 인덱스를 사용하는지 확인한다.

è  SP에서 데이터 형식 우선 순위에 따른 형식 변환이 일어나지 않도록 컬럼 타입과 동일한 타입의 파라미터를 사용 한다.

@searchColumnA NVARCHAR(12)

SELECT * FROM A WITH (READUNCOMMITTED)

WHERE columnA = @searchColumnA

-       columnA 의 타입이 VARCHAR 이면 NVARCHAR 의 우선순위가 높아 아래와 같이 CONVERT 가 발생하여 Performance 를 저하 시킨다.

SELECT * FROM A WITH (READUNCOMMITTED) WHERE CONVERT(NVARCHAR(12), columnA)

è  set nocount on 을 먼저 실행하라 : 불필요한 메시지를 표시하지 않는다.


5.     예상 실행 계획을 자주 확인하라.

실행계획의 내용은 꼼꼼히 따져봐야 한다. 튜닝의 시작은 성능 분석이다.

(그래픽 실행 계획 아이콘)


6.     Index를 타는지 항상 체크하라.

Index를 활용하지 않은 검색은 데이터가 많으면 많을수록 성능은 급격히 떨어진다.

7.     Clustered Index Seek를 항상 체크하라.

Clustered Index Scan을 타는 것 만으로도 속도는 향상이 되지만 완전하진 않다.
Clustered Index column
의 일정 구간을 타는 Seek여야 한다.

일반 Non Clustered Index의 경우는 Clustered를 찾기 위해 해당 column Clustered Index 정보를 호출해야 하는 부담이 생긴다.

Clustered Index Non Clustered Index Index 구조의 차이 : (클러스터형 인덱스 구조) , (비클러스터형 인덱스 구조)


8.     기타…..

è  Index 설정시 DESC 정렬을 해야 빠른가 ?

그렇지 않다.
오름차순이건 내림차순이건 Index가 걸려있으면 조건에 따라 Clustered Index를 찾아 가게 된다.

è  Clustered Index Seek를 타면 무조건 빠른가 ?

그렇지 않다.

è  Non Clustered Index column은 무조건 마지막엔 Clustered Index Column을 조회하는가 ?

그렇지 않다.

è  Clustered Index Table 당 하나만 존재 한다.

è  Table로부터 하나 혹은 소수의 Row들을 리턴하는 SQL Query인 경우에 Nonclustered Index가 적합하고, 많은 수의 Row들을 리턴하는 것이 필요한 Query들의 경우에는 Clustered Index가 더 적합하다.


'DataBase' 카테고리의 다른 글

샘플 재귀 쿼리문  (0) 2010.06.28
Windows Server 2008 R2에서 SQL Server 2008 원격 접속 허용하기  (1) 2010.06.25
SQL index 초기화  (0) 2009.11.25
새로운 SQL 잘라내기 공격 및 대처 방법  (0) 2009.07.06
MS-SQL 트리거  (0) 2009.07.03

I’m responsible for a couple of SharePoint 2007 (MOSS) farms where all SharePoint servers showed the following error in the system event log:


Event Type: Error
Event Source: DCOM
Event Category: None
Event ID: 10016
Date: 1/17/2007
Time: 4:31:48 AM
User: <DOMAIN>\sa_adm
Computer: <SERVER>
Description:

The application-specific permission settings do not grant Local Activation permission for the COM Server application with CLSID

{61738644-F196-11D0-9953-00C04FD919C1}

to the user <DOMAIN>\sa_adm SID (S-1-5-21-162740987-2502514208-3469184634-1119). This security permission can be modified using the Component Services administrative tool.

For more information, see Help and Support Center at http://go.microsoft.com/fwlink/events.asp.

The error would show up at regular intervals in clusters (4-12 at roughly the same time) and there would be a few more with other usernames and other class id’s. I had two fully functional farms with 3 SharePoint servers each and a number of standalone development machines. They all exhibited similar behavior.

The error listed above is that the user running the Central Administration web application doesn’t have access to activate (instantiate) the IIS WAMREG admin Service object (search the registry for the CLSID).

Strangely enough I didn’t observe any functional errors in the farms as a result of these errors – nothing seemed amiss (plenty of stuff didn’t work but none directly related to this).

An important note here is that the service users used in the farm are all standard domain accounts and only given additional local rights by the SharePoint installer and Central Administration (The one exception is that “aspnet_regiis -ga IIS_WPG” was executed after SharePoint install and initial configuration).

The following procedure removes the errors from the event log without compromising the entire security setup (yes, assign administrative rights for the service users would do the trick too) and has been verified by Microsoft consulting services.

On each SharePoint server do the following:

  1. Click Start, Click Run, type “dcomcnfg” and click ok
  2. Expand Component Services / Computers / My Computer / DCOM Config

  3. Right click IIS WAMREG admin Service and choose Properties
  4. Click the Security tag
  5. Click Edit under Launch and Activation Permissions

  6. Click Add
  7. In the Select Users, Computers or Groups type computername\WSS_WPG and
    computername\WSS_ADMIN_WPG

  8. Click ok
  9. In the Permissions for UserName list, click to select the Allow check box

  10. Click Ok twice.
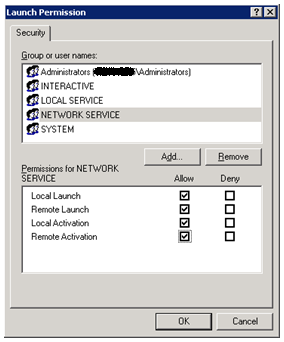
  11. Go back to the main Component Services window, right click the “netman” node and select Properties
  12. Click the security tab
  13. Click Edit under Activation Permissions
  14. Click Add on the Launch Permissons Dialog
  15. Enter “NETWORK SERVICE” in the edit box
  16. Click Ok
  17. Enable all the checkboxes for the NETWORK SERVICE

  18. Click Ok twice
  19. Finally, run “IISReset”

That should be it!

A little less event log errors to worry about – there are plenty left on a reasonable complex SharePoint farm…

As a side note: The above error also shows up in other applications as well – I’ve heard about it for exchange servers as well and more applications are probably affected. In that case you’ll need to search the registry for the actual DCOM application and assign the rights to another local group (or username as a last resort).

http://soerennielsen.wordpress.com/2007/04/16/fixing-those-pesky-dcom-event-log-error-10016-in-a-sharepoint-farm-environment/


Here is a Code snippet for retrieving user profile picture using Client Object model – ECMAScript . I am passing the userId from the front end to a javascript method called “getUserProfile()” to retrieve the user profile info. The method onQuerySucceeded will get you the user Profile info.

function getUserProfile(userID)
{
var clientContext = new SP.ClientContext.get_current();

var web = clientContext.get_web();

var userInfoList = web.get_siteUserInfoList();

var camlQuery = new SP.CamlQuery();

camlQuery.set_viewXml(‘<View><Query><Where><Eq><FieldRef Name=\’ID\’/>’ +’<Value Type=\’Number\’>’ + userID + ‘</Value></Eq>’ +

‘</Where></Query><RowLimit>1</RowLimit></View>’);

this.collListItem = userInfoList.getItems(camlQuery);

clientContext.load(collListItem);

clientContext.executeQueryAsync(Function.createDelegate(this, this.onQuerySucceeded),Function.createDelegate(this, this.onQueryFailed));
}

function onQuerySucceeded(sender, args)
{

var item = collListItem.itemAt(0);

var profile = item.get_item(‘Notes’);

var pictureUrl = item.get_item(‘Picture’).get_url();

var userImage = document.getElementById(‘myImageContainer’); -> Image object

userImage.src = pictureUrl;

var profileDiv = document.getElementById(‘userProfileContainer’);

profileDiv.innerHTML = profile;
}

This screen cast demonstrates how to change the behavior of opening PDF files and other un-trusted files served from SharePoint 2010.  

A Web Applications General Settings allow you to change the File Handling as it’s serviced from SharePoint to the clients IE 8 Browser.  By default the X-Download-Options of the MIME-Handling header is set to Force Save or noopen. To change the behavior set the Browser File Handling to Permissive rather than Strict to allow the file to be open in the browser.

http://vimeo.com/13350185

Browser File Handling 
Specifies whether additional security headers are added to documents served to web browsers. These headers specify that a browser should show a download prompt for certain types of files (for example, .html) and to use the server's specified MIME type for other types of files.

  • Permissive Specifies no headers are added, which provides a more compatible user experience.
  • Strict Adds headers that force the browser to download certain types of files. The forced download improves security for the server by disallowing the automatic execution of Web content that contributors upload.


- 출처 URL : http://www.borghoff.com/post/2010/07/14/SharePoint-2010-Document-File-Open-Behavior.aspx


private static void EnablingAlternateLanguages(SPSite site, SPWeb web)
{
    SPWebTemplateCollection templates = site.GetWebTemplates(web.Language);
    SPWebTemplate template = templates[web.WebTemplate];

    if (template.SupportsMultilingualUI)
    {
        web.IsMultilingual = true;

        SPLanguageCollection installed = SPRegionalSettings.GlobalInstalledLanguages;
        IEnumerable supported = web.SupportedUICultures;

        foreach (SPLanguage language in installed)
        {
            CultureInfo culture = new CultureInfo(language.LCID);
            if (!supported.Contains(culture))
            {
                web.AddSupportedUICulture(culture);
            }
        }
    }
}

방화벽 설정이 되어 있는 웹 서버에서

80 포트가 아닌 별도의 포트로 웹 응용 프로그램 생성하면

외부에서 사이트 접근이 되지 않아 당황스러울 경우가 있습니다.


Windows Server 2008에 SharePoint 설치 시,

80포트와 중앙관리 포트 및 웹 서비스 등 기본적인 것에 대해서는 인바운드 규칙에 추가되어 예외 처리되어 있지만,

별도의 포트의 경우 수동으로 추가 해주셔야 합니다.


[규칙 추가 방법]

1.     제어판에서 시스템 및 보안 방화벽 상태 확인(Windows 방화벽) “을 클릭합니다.

2.     좌측 메뉴의 고급 설정에 들어갑니다.

3.     인바운드 규칙에 보시면 아래와 같이 기본 포트에 대해서는 규칙 추가되어 있는 것을 볼 수 있습니다.


4.     새 규칙을 클릭 하여, 포트 선택합니다.


5.     TCP 선택, 특정 로컬 포트에 웹 응용 프로그램 포트를 지정합니다.


6.     연결 허용을 선택합니다.


7.     규칙 적용되는 시기를 선택합니다. (필자는 전체 선택함)


8.     규칙에 대한 이름 및 설명 적어 주시면 됩니다.


Example 1: innerHTML

DOM table methods using innerHTML to fill in cells

function addRowInnerHTML(tblId)
{
  var tblBody = document.getElementById(tblId).tBodies[0];
  var newRow = tblBody.insertRow(-1);
  var newCell0 = newRow.insertCell(0);
  newCell0.innerHTML = '';
  var newCell1 = newRow.insertCell(1);
  newCell1.innerHTML = 'cell 1 - just plain text';
}

Example 2: DOM

DOM table methods using DOM to fill in cells

function addRowDOM(tblId)
{
  var tblBody = document.getElementById(tblId).tBodies[0];
  var newRow = tblBody.insertRow(-1);
  var newCell0 = newRow.insertCell(0);
  var newInput = document.createElement('input');
  newInput.type = 'text';
  newInput.value = 'cell 0 - text box';
  newInput.style.color = 'blue';
  newCell0.appendChild(newInput);
  var newCell1 = newRow.insertCell(1);
  newCell1.appendChild(document.createTextNode('cell 1 - just plain text'));
}

Example 3: DOM Clone

cloneNode to clone an existing row

function addRowClone(tblId)
{
  var tblBody = document.getElementById(tblId).tBodies[0];
  var newNode = tblBody.rows[0].cloneNode(true);
  tblBody.appendChild(newNode);
}

// ----------------------------------
// Map 정의
// ----------------------------------
var Map = function () {
    this._array = new Array(); // Map배열
    this.pointer = 0;

    this._getIndexByKey = function (key) {
        for (var i = 0; i < this._array.length; i++) {
            if (key == this._array[i][0]) {
                return i;
            }
        }
        return -1;
    }

    this.put = function (key, value) {
        var index = this._getIndexByKey(key)

        if (index == -1) {
            var newArray = new Array(); // key와value를 담는 배열
            newArray[0] = key;
            newArray[1] = value;
            this._array[this._array.length] = newArray;
        } else {
            this._array[index][1] = value;
        }
    }

    this.get = function (key) {

        for (var i = 0; i < this._array.length; i++) {
            if (this._array[i][0] == key)
                return this._array[i][1];
        }

    }

    this.isNext = function () {
        var result;
        if (this._array.length > this.pointer) {
            result = true;
        } else {
            result = false;
        }
        this.pointer++;
        return result;
    }

    this.size = function () {
        return this._array.length;
    }

    this.nowKey = function () {
        return this._array[this.pointer - 1][0];
    }
    this.nowValue = function () {
        return this._array[this.pointer - 1][1];
    }
}


 /*==============================================================================
Function : javaScript Map
Return   :
examples :
: get(key), getKey(value), put(key, value), size(), remove(key),
clear(), keys(), values(), containsKey(key), containsValue(value),
isEmpty(), putAll(map), toString(separator)
==============================================================================*/
function Map(Delimitor) {
    this.Delimitor = (Delimitor == null ? "||" : Delimitor);
    this._MapClass = new ActiveXObject("Scripting.Dictionary");

    this.get = function (key) { return this._MapClass.exists(key) ? this._MapClass.item(key) : null; }
    this.getKey = function (value) {
        var keys = this.keys();
        var values = this.values();
        for (var i in values) {
            if (value == values[i]) return keys[i];
        }
        return "";
    }
    this.put = function (key, value) {
        var oldValue = this._MapClass.item(key);
        this._MapClass.item(key) = value;
        return value;
    }
    this.size = function () { return this._MapClass.count; }
    this.remove = function (key) {
        var value = this._MapClass.item(key);
        this._MapClass.remove(key);
        return value;
    }
    this.clear = function () {
        this._MapClass.removeAll();
    }
    this.keys = function () {
        return this._MapClass.keys().toArray();
    }
    this.values = function () {
        return this._MapClass.items().toArray();
    }
    this.containsKey = function (key) {
        return this._MapClass.exists(key);
    }
    this.containsValue = function (value) {
        var values = this.values();
        for (var i in values) {
            if (value == values[i]) {
                return true;
            }
        }
        return false;
    }
    this.isEmpty = function () { return this.size() <= 0; }
    this.putAll = function (map) {
        if (!(map instanceof Map)) {
            throw new Error(0, "Map.putAll(Map) method are required Map type parameter.");
        }
        var keys = map.keys();
        for (var i in keys) {
            this.put(keys[i], map.get(keys[i]));
        }
        return this;
    }

    this.toString = function (separator) {
        var keys = this.keys();
        var result = "";
        separator = separator == null ? "&" : separator;
        for (var i in keys) {
            result += (keys[i] + this.Delimitor + this._MapClass.item(keys[i]));
            if (i < this.size() - 1) {
                result += separator;
            }
        }
        return result;
    }
}


샘플 코드1.
function Set_Comma(n) {
     if (n.indexOf('.') >=0) {
        return Number(  String(  n.split('.')[0]    ).replace(/\..*|[^\d]/g,"")).toLocaleString().slice(0,-3)  + '.' + String(n.split('.')[1]);
     }
     else {
         return Number(String(n).replace(/\..*|[^\d]/g,"")).toLocaleString().slice(0,-3);
     }
}

샘플 코드2.
function addComma(n) {
        var reg = /(^[+-]?\d+)(\d{3})/;
        n += '';

        while (reg.test(n)) {
            n = n.replace(reg, '$1' + ',' + '$2');
        }
    return n;
}


'Web Platform' 카테고리의 다른 글

HTML Table Add Row - innerHTML vs. DOM vs. cloneNode  (1) 2010.08.02
javascript Map 구현  (0) 2010.06.28
jQuery Calendar  (0) 2010.06.28
jQuery ajaxSubmit 간단 예제  (0) 2010.06.28
jQuery에서 체크 박스 전체 선택 or 전제 해제  (0) 2010.06.28

1. FullCalendar

FullCalendar is a famous jQuery calendar plugin which offers features like drag-and-drop, integration with Google Calendar and able to fetch events through JSON. Designers can easily customize the look and feel of the calendar, while developers can utilize the exposed hooks for user-triggered events.
FullCalendar

2. Astonishing iCal-like Calendar

This is a tutorial which uses both jQuery and CSS to build an iPhone styled calendar application. The author also implement the Coda-like effect for the popup event.
Astonishing iCal-like Calendar

3. jQuery UI Datepicker

The jQuery UI Datepicker is a highly configurable plugin that adds date picker functionality to your pages. You can customize the date format and language, restrict the selectable date ranges and add in buttons and other navigation options easily.
jQuery UI Datepicker

4. jMonthCalendar

jMonthCalendar supports full month calendar and events. The interesting part of this plugin is it allows developers to interact with the calendar.
jMonthCalendar

5. Date Picker

Date Picker is a jQuery calendar plugin released under MIT and GPL licenses. It has a lot of options and features. For example, you can have multiple calendars in the component, mark dates as special days, easy to customize through CSS and allow different selection modes. All these can be easily setup though the configuration options.
Date Picker

6. jQuery Week Calendar

jQuery Week Calendar is a plugin which will include a weekly calendar in the web application. The events can be supplied as an array or JSON, and these events can be easily drag, drop and resize. There are a lot of options and event callbacks which you can refer through the official plugin page.
jQuery Week Calendar

7. Simple jQuery Date-picker Plugin

This is a very simple date picker plugin. However, it provides a lot of useful and necessary features for a date picker. For example, you can easily navigate to the months and years through the drop down selection boxes.
Simple jQuery Date-picker Plugin

8. jQuery Date Picker Plugin

This is an clean, unobtrusive plugin for jQuery which allows you to easily add date picker to your web forms and pages. There are a lot of configurations and options for this simple plugin. You can refer to the plugin page for more examples of how to use this plugin.
jQuery Date Picker Plugin

9. jQuery Interactive Date Range Picker

This powerful date range picker is a modified version of jQuery UI’s Datepicker component. It has a quicker date selection from a list of preset dates/ranges and a smooth transitions. The latest version uses the jQuery UI 1.7 and jQuery UI CSS Framework. With the power of jQuery UI, user can now switch the calendar theme easily.
jQuery Interactive Date Range Picker


//================================================
// 메일 발송전 폼 체크
// 2009-11-06
// kdonghwa
//================================================
function formCheck() {
    if (jQuery('#fromMail').val().length == 0) {
        alert('발송 메일 주소를 적어주세요');
        jQuery('#fromMail').focus();
        return false;
    }
    if (jQuery('#title').val().length == 0) {
        alert('메일 제목을 적어주세요');
        jQuery('#title').focus();
        return false;
    }
    if (jQuery('#content').val().length == 0) {
        alert('메일 내용을 적어주세요');
        jQuery('#content').focus();
        return false;
    }
    return true;
}

//================================================
// 메일 발송Ajax
// 2009-11-06
// kdonghwa
//================================================
function sendMail() {
    var options = {
        beforeSubmit: formCheck,
        success: responseCtl,
        url: "/url.do",
        contentType: "application/x-www-form-urlencoded;charset=UTF-8",
        type: "post", /* get, post */
        dataType: "html" /* xml, html, script, json */
    };
    jQuery("#fmMailInfo").ajaxSubmit(options);
}

//================================================
// 메일 발송결과 처리
// 2009-11-06
// kdonghwa
//================================================
function responseCtl(html, status) {
    if (status == 'success') {
        alert('메일을 발송하였습니다.');
        self.close();
    }
    else {
        alert('메일 발송에 실패하였습니다!');
    }
}


 jQuery(document).ready(function() {
         //=========================================================
         // 체크 박스 클릭시 전체 선택 or 전체 선택 해제
         //=========================================================
         jQuery("#check_all").click(function() {
                if (jQuery("#check_all:checked").length > 0) {
                     jQuery('input:checkbox[name=userCheck]:not(checked)').attr("checked", "checked");
                } else {
                    jQuery('input:checkbox[name=userCheck]:checked').attr("checked", "");
                }
         });
 });

+ Recent posts